Epson XP-640 Users Guide - Page 194
Cleaning the Paper Path, Vertical Alignment, Horizontal Alignment, Parent topic, Related topics
 |
View all Epson XP-640 manuals
Add to My Manuals
Save this manual to your list of manuals |
Page 194 highlights
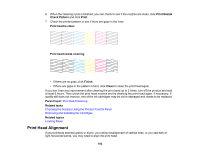
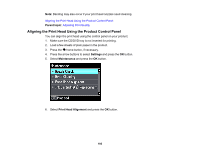
7. Select Vertical Alignment or Horizontal Alignment and press the OK button. 8. Press the start button to print an alignment sheet. Note: Do not cancel printing while you are printing a head alignment pattern. 9. Check the printed pattern and select the number representing the most solid printed pattern for each set on the LCD screen. 10. Press the OK button when you are finished. Parent topic: Print Head Alignment Related topics Loading Paper Cleaning the Paper Path If you see ink on the back of a printout, you can clean the paper path to remove any excess ink. 194
-
 1
1 -
2
-
3
-
4
-
5
-
6
-
7
-
8
-
9
-
10
-
11
-
12
-
13
-
14
-
15
-
16
-
17
-
18
-
19
-
20
-
21
-
22
-
23
-
24
-
25
-
26
-
27
-
28
-
29
-
30
-
31
-
32
-
33
-
34
-
35
-
36
-
37
-
38
-
39
-
40
-
41
-
42
-
43
-
44
-
45
-
46
-
47
-
48
-
49
-
50
-
51
-
52
-
53
-
54
-
55
-
56
-
57
-
58
-
59
-
60
-
61
-
62
-
63
-
64
-
65
-
66
-
67
-
68
-
69
-
70
-
71
-
72
-
73
-
74
-
75
-
76
-
77
-
78
-
79
-
80
-
81
-
82
-
83
-
84
-
85
-
86
-
87
-
88
-
89
-
90
-
91
-
92
-
93
-
94
-
95
-
96
-
97
-
98
-
99
-
100
-
101
-
102
-
103
-
104
-
105
-
106
-
107
-
108
-
109
-
110
-
111
-
112
-
113
-
114
-
115
-
116
-
117
-
118
-
119
-
120
-
121
-
122
-
123
-
124
-
125
-
126
-
127
-
128
-
129
-
130
-
131
-
132
-
133
-
134
-
135
-
136
-
137
-
138
-
139
-
140
-
141
-
142
-
143
-
144
-
145
-
146
-
147
-
148
-
149
-
150
-
151
-
152
-
153
-
154
-
155
-
156
-
157
-
158
-
159
-
160
-
161
-
162
-
163
-
164
-
165
-
166
-
167
-
168
-
169
-
170
-
171
-
172
-
173
-
174
-
175
-
176
-
177
-
178
-
179
-
180
-
181
-
182
-
183
-
184
-
185
-
186
-
187
-
188
-
 189
189 -
 190
190 -
 191
191 -
 192
192 -
 193
193 -
 194
194 -
 195
195 -
 196
196 -
 197
197 -
 198
198 -
 199
199 -
200
-
201
-
202
-
203
-
204
-
205
-
206
-
207
-
208
-
209
-
210
-
211
-
212
-
213
-
214
-
215
-
216
-
217
-
218
-
219
-
220
-
221
-
222
-
223
-
224
-
225
-
226
-
227
-
228
-
229
-
230
-
231
-
232
-
233
-
234
-
235
-
236
-
237
-
238
-
239
-
240
-
241
-
242
-
243
-
244
-
245
-
246
-
247
-
248
-
249
-
250
-
251
-
252
-
253
-
254
-
255
-
256
-
257
-
258
-
259
-
260
-
261
-
262
 |
 |

194
7.
Select
Vertical Alignment
or
Horizontal Alignment
and press the
OK
button.
8.
Press the
start button to print an alignment sheet.
Note:
Do not cancel printing while you are printing a head alignment pattern.
9.
Check the printed pattern and select the number representing the most solid printed pattern for each
set on the LCD screen.
10. Press the
OK
button when you are finished.
Parent topic:
Print Head Alignment
Related topics
Loading Paper
Cleaning the Paper Path
If you see ink on the back of a printout, you can clean the paper path to remove any excess ink.