Epson XP-640 Users Guide - Page 198
Cleaning and Transporting Your Product, Print Head Cleaning, Removing a Memory Card, Parent topic
 |
View all Epson XP-640 manuals
Add to My Manuals
Save this manual to your list of manuals |
Page 198 highlights
8. Disconnect any connected cables. 9. Close the output tray and front cover, then lower the control panel. 10. Place the product in its original packing materials, if possible, or use equivalent materials with cushioning around the product. Keep the product level during transportation. Be sure to remove the tape from the ink cartridge holder before turning on your product. If print quality has declined when you print again, clean and align the print head. Parent topic: Cleaning and Transporting Your Product Related concepts Print Head Cleaning Print Head Alignment Related tasks Removing a Memory Card 198
-
 1
1 -
2
-
3
-
4
-
5
-
6
-
7
-
8
-
9
-
10
-
11
-
12
-
13
-
14
-
15
-
16
-
17
-
18
-
19
-
20
-
21
-
22
-
23
-
24
-
25
-
26
-
27
-
28
-
29
-
30
-
31
-
32
-
33
-
34
-
35
-
36
-
37
-
38
-
39
-
40
-
41
-
42
-
43
-
44
-
45
-
46
-
47
-
48
-
49
-
50
-
51
-
52
-
53
-
54
-
55
-
56
-
57
-
58
-
59
-
60
-
61
-
62
-
63
-
64
-
65
-
66
-
67
-
68
-
69
-
70
-
71
-
72
-
73
-
74
-
75
-
76
-
77
-
78
-
79
-
80
-
81
-
82
-
83
-
84
-
85
-
86
-
87
-
88
-
89
-
90
-
91
-
92
-
93
-
94
-
95
-
96
-
97
-
98
-
99
-
100
-
101
-
102
-
103
-
104
-
105
-
106
-
107
-
108
-
109
-
110
-
111
-
112
-
113
-
114
-
115
-
116
-
117
-
118
-
119
-
120
-
121
-
122
-
123
-
124
-
125
-
126
-
127
-
128
-
129
-
130
-
131
-
132
-
133
-
134
-
135
-
136
-
137
-
138
-
139
-
140
-
141
-
142
-
143
-
144
-
145
-
146
-
147
-
148
-
149
-
150
-
151
-
152
-
153
-
154
-
155
-
156
-
157
-
158
-
159
-
160
-
161
-
162
-
163
-
164
-
165
-
166
-
167
-
168
-
169
-
170
-
171
-
172
-
173
-
174
-
175
-
176
-
177
-
178
-
179
-
180
-
181
-
182
-
183
-
184
-
185
-
186
-
187
-
188
-
189
-
190
-
191
-
192
-
 193
193 -
 194
194 -
 195
195 -
 196
196 -
 197
197 -
 198
198 -
 199
199 -
 200
200 -
 201
201 -
 202
202 -
 203
203 -
204
-
205
-
206
-
207
-
208
-
209
-
210
-
211
-
212
-
213
-
214
-
215
-
216
-
217
-
218
-
219
-
220
-
221
-
222
-
223
-
224
-
225
-
226
-
227
-
228
-
229
-
230
-
231
-
232
-
233
-
234
-
235
-
236
-
237
-
238
-
239
-
240
-
241
-
242
-
243
-
244
-
245
-
246
-
247
-
248
-
249
-
250
-
251
-
252
-
253
-
254
-
255
-
256
-
257
-
258
-
259
-
260
-
261
-
262
 |
 |
198
8.
Disconnect any connected cables.
9.
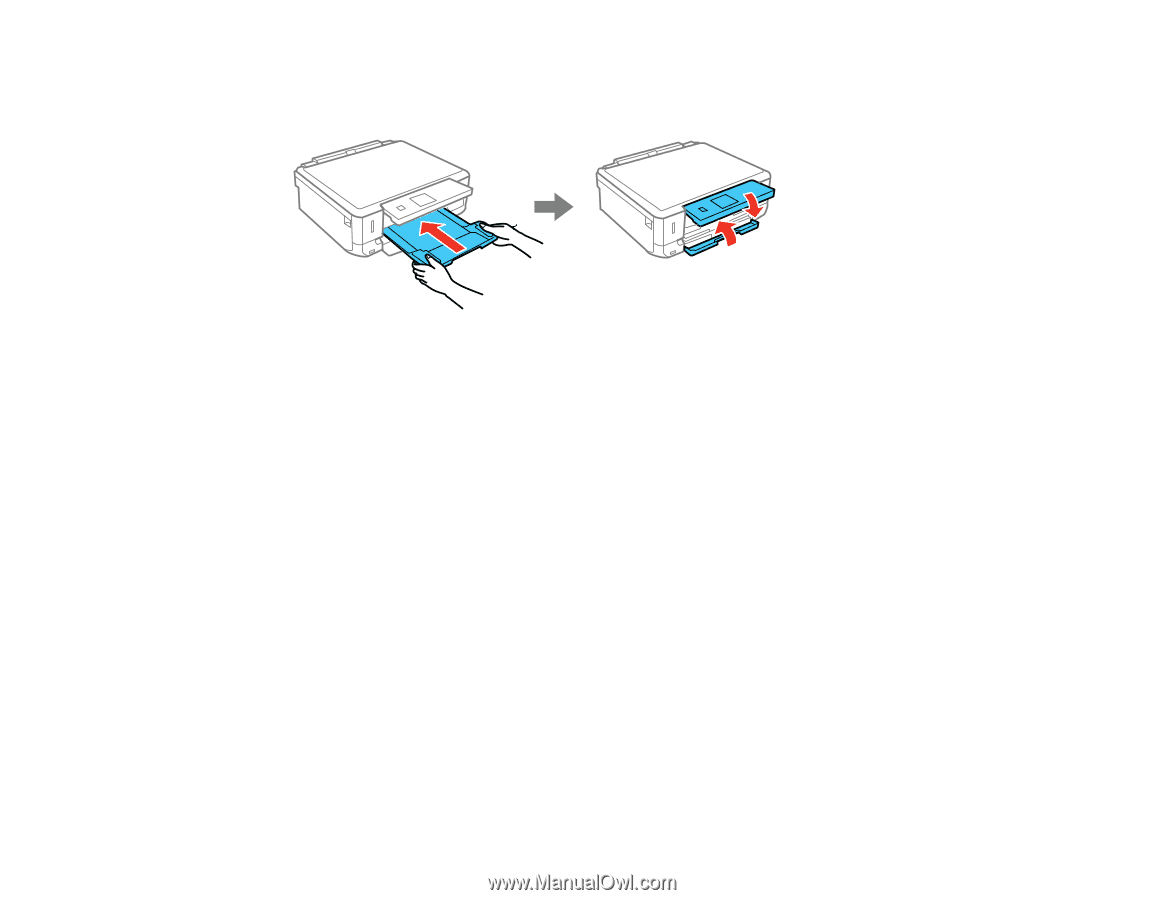
Close the output tray and front cover, then lower the control panel.
10. Place the product in its original packing materials, if possible, or use equivalent materials with
cushioning around the product.
Keep the product level during transportation. Be sure to remove the tape from the ink cartridge holder
before turning on your product. If print quality has declined when you print again, clean and align the
print head.
Parent topic:
Cleaning and Transporting Your Product
Related concepts
Print Head Cleaning
Print Head Alignment
Related tasks
Removing a Memory Card