Epson XP-950 User Manual - Page 202
Adjusting CD/DVD Print Position - Windows, Printing on a CD/DVD with Windows
 |
View all Epson XP-950 manuals
Add to My Manuals
Save this manual to your list of manuals |
Page 202 highlights
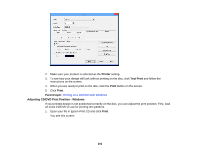
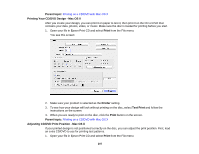
2. Make sure your product is selected as the Printer setting. 3. To see how your design will look without printing on the disc, click Test Print and follow the instructions on the screen. 4. When you are ready to print on the disc, click the Print button on the screen. 5. Click Print. Parent topic: Printing on a CD/DVD with Windows Adjusting CD/DVD Print Position - Windows If your printed design is not positioned correctly on the disc, you can adjust the print position. First, load an extra CD/DVD to use for printing test patterns. 1. Open your file in Epson Print CD and click Print. You see this screen: 202
-
 1
1 -
2
-
3
-
4
-
5
-
6
-
7
-
8
-
9
-
10
-
11
-
12
-
13
-
14
-
15
-
16
-
17
-
18
-
19
-
20
-
21
-
22
-
23
-
24
-
25
-
26
-
27
-
28
-
29
-
30
-
31
-
32
-
33
-
34
-
35
-
36
-
37
-
38
-
39
-
40
-
41
-
42
-
43
-
44
-
45
-
46
-
47
-
48
-
49
-
50
-
51
-
52
-
53
-
54
-
55
-
56
-
57
-
58
-
59
-
60
-
61
-
62
-
63
-
64
-
65
-
66
-
67
-
68
-
69
-
70
-
71
-
72
-
73
-
74
-
75
-
76
-
77
-
78
-
79
-
80
-
81
-
82
-
83
-
84
-
85
-
86
-
87
-
88
-
89
-
90
-
91
-
92
-
93
-
94
-
95
-
96
-
97
-
98
-
99
-
100
-
101
-
102
-
103
-
104
-
105
-
106
-
107
-
108
-
109
-
110
-
111
-
112
-
113
-
114
-
115
-
116
-
117
-
118
-
119
-
120
-
121
-
122
-
123
-
124
-
125
-
126
-
127
-
128
-
129
-
130
-
131
-
132
-
133
-
134
-
135
-
136
-
137
-
138
-
139
-
140
-
141
-
142
-
143
-
144
-
145
-
146
-
147
-
148
-
149
-
150
-
151
-
152
-
153
-
154
-
155
-
156
-
157
-
158
-
159
-
160
-
161
-
162
-
163
-
164
-
165
-
166
-
167
-
168
-
169
-
170
-
171
-
172
-
173
-
174
-
175
-
176
-
177
-
178
-
179
-
180
-
181
-
182
-
183
-
184
-
185
-
186
-
187
-
188
-
189
-
190
-
191
-
192
-
193
-
194
-
195
-
196
-
 197
197 -
 198
198 -
 199
199 -
 200
200 -
 201
201 -
 202
202 -
 203
203 -
 204
204 -
 205
205 -
 206
206 -
 207
207 -
208
-
209
-
210
-
211
-
212
-
213
-
214
-
215
-
216
-
217
-
218
-
219
-
220
-
221
-
222
-
223
-
224
-
225
-
226
-
227
-
228
-
229
-
230
-
231
-
232
-
233
-
234
-
235
-
236
-
237
-
238
-
239
-
240
-
241
-
242
-
243
-
244
-
245
-
246
-
247
-
248
-
249
-
250
-
251
-
252
-
253
-
254
-
255
-
256
-
257
-
258
-
259
-
260
-
261
-
262
-
263
-
264
-
265
-
266
-
267
-
268
-
269
-
270
-
271
-
272
-
273
-
274
-
275
-
276
-
277
-
278
-
279
-
280
-
281
-
282
-
283
-
284
-
285
-
286
-
287
-
288
-
289
-
290
-
291
-
292
-
293
-
294
-
295
-
296
-
297
-
298
-
299
-
300
 |
 |

2.
Make sure your product is selected as the
Printer
setting.
3.
To see how your design will look without printing on the disc, click
Test Print
and follow the
instructions on the screen.
4.
When you are ready to print on the disc, click the
Print
button on the screen.
5.
Click
Print
.
Parent topic:
Printing on a CD/DVD with Windows
Adjusting CD/DVD Print Position - Windows
If your printed design is not positioned correctly on the disc, you can adjust the print position. First, load
an extra CD/DVD to use for printing test patterns.
1.
Open your file in Epson Print CD and click
Print
.
You see this screen:
202