Epson XP-950 User Manual - Page 210
Print Density Check Pattern, Print, Color Correction, Second Time, Parent topic, and select
 |
View all Epson XP-950 manuals
Add to My Manuals
Save this manual to your list of manuals |
Page 210 highlights
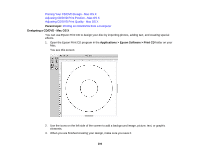
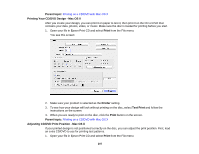
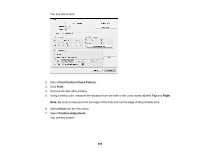
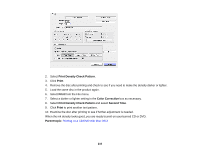
2. Select Print Density Check Pattern. 3. Click Print. 4. Remove the disc after printing and check to see if you need to make the density darker or lighter. 5. Load the same disc in the product again. 6. Select Print from the File menu. 7. Select a darker or lighter setting in the Color Correction box as necessary. 8. Select Print Density Check Pattern and select Second Time. 9. Click Print to print another test pattern. 10. Examine the disc after printing to see if further adjustment is needed. When the ink density looks good, you are ready to print on your burned CD or DVD. Parent topic: Printing on a CD/DVD with Mac OS X 210
-
 1
1 -
2
-
3
-
4
-
5
-
6
-
7
-
8
-
9
-
10
-
11
-
12
-
13
-
14
-
15
-
16
-
17
-
18
-
19
-
20
-
21
-
22
-
23
-
24
-
25
-
26
-
27
-
28
-
29
-
30
-
31
-
32
-
33
-
34
-
35
-
36
-
37
-
38
-
39
-
40
-
41
-
42
-
43
-
44
-
45
-
46
-
47
-
48
-
49
-
50
-
51
-
52
-
53
-
54
-
55
-
56
-
57
-
58
-
59
-
60
-
61
-
62
-
63
-
64
-
65
-
66
-
67
-
68
-
69
-
70
-
71
-
72
-
73
-
74
-
75
-
76
-
77
-
78
-
79
-
80
-
81
-
82
-
83
-
84
-
85
-
86
-
87
-
88
-
89
-
90
-
91
-
92
-
93
-
94
-
95
-
96
-
97
-
98
-
99
-
100
-
101
-
102
-
103
-
104
-
105
-
106
-
107
-
108
-
109
-
110
-
111
-
112
-
113
-
114
-
115
-
116
-
117
-
118
-
119
-
120
-
121
-
122
-
123
-
124
-
125
-
126
-
127
-
128
-
129
-
130
-
131
-
132
-
133
-
134
-
135
-
136
-
137
-
138
-
139
-
140
-
141
-
142
-
143
-
144
-
145
-
146
-
147
-
148
-
149
-
150
-
151
-
152
-
153
-
154
-
155
-
156
-
157
-
158
-
159
-
160
-
161
-
162
-
163
-
164
-
165
-
166
-
167
-
168
-
169
-
170
-
171
-
172
-
173
-
174
-
175
-
176
-
177
-
178
-
179
-
180
-
181
-
182
-
183
-
184
-
185
-
186
-
187
-
188
-
189
-
190
-
191
-
192
-
193
-
194
-
195
-
196
-
197
-
198
-
199
-
200
-
201
-
202
-
203
-
204
-
 205
205 -
 206
206 -
 207
207 -
 208
208 -
 209
209 -
 210
210 -
 211
211 -
 212
212 -
 213
213 -
 214
214 -
 215
215 -
216
-
217
-
218
-
219
-
220
-
221
-
222
-
223
-
224
-
225
-
226
-
227
-
228
-
229
-
230
-
231
-
232
-
233
-
234
-
235
-
236
-
237
-
238
-
239
-
240
-
241
-
242
-
243
-
244
-
245
-
246
-
247
-
248
-
249
-
250
-
251
-
252
-
253
-
254
-
255
-
256
-
257
-
258
-
259
-
260
-
261
-
262
-
263
-
264
-
265
-
266
-
267
-
268
-
269
-
270
-
271
-
272
-
273
-
274
-
275
-
276
-
277
-
278
-
279
-
280
-
281
-
282
-
283
-
284
-
285
-
286
-
287
-
288
-
289
-
290
-
291
-
292
-
293
-
294
-
295
-
296
-
297
-
298
-
299
-
300
 |
 |
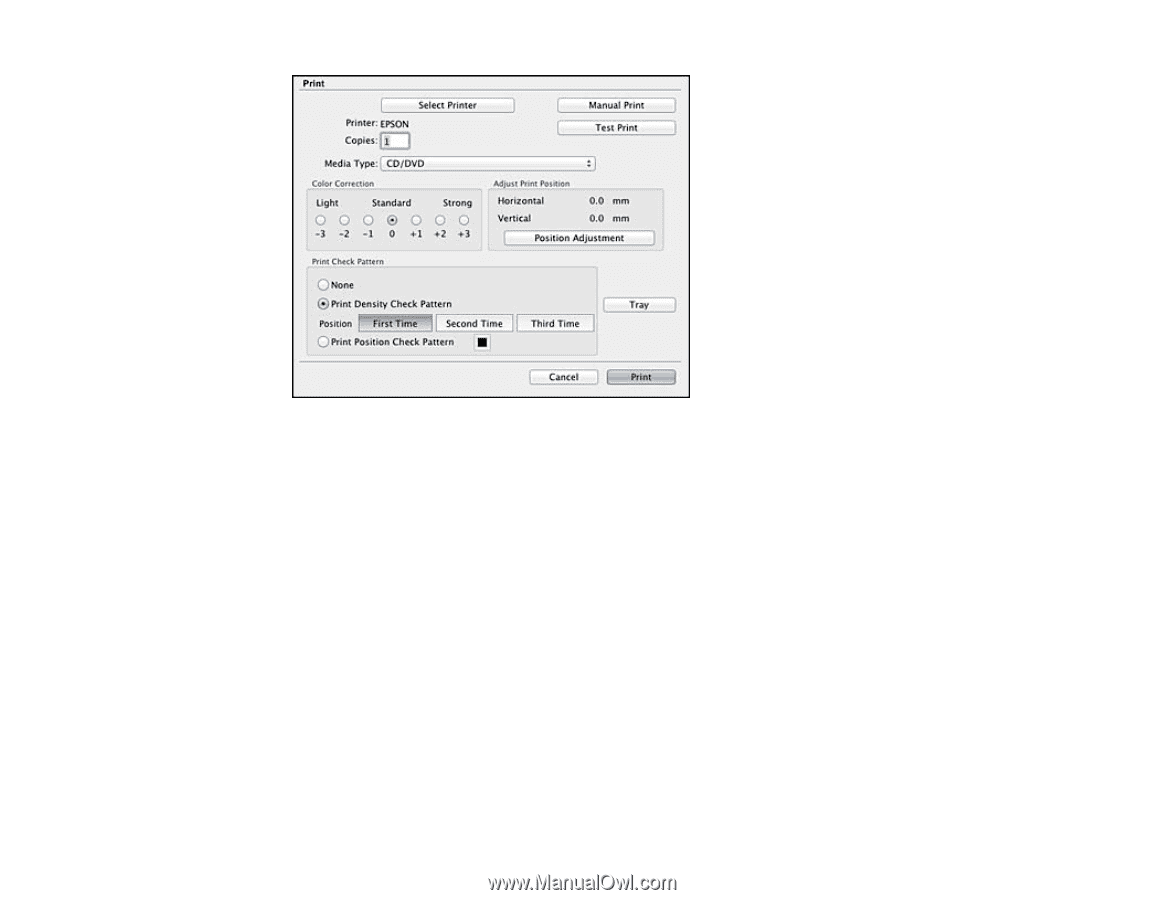
2.
Select
Print Density Check Pattern
.
3.
Click
Print
.
4.
Remove the disc after printing and check to see if you need to make the density darker or lighter.
5.
Load the same disc in the product again.
6.
Select
Print
from the File menu.
7.
Select a darker or lighter setting in the
Color Correction
box as necessary.
8.
Select
Print Density Check Pattern
and select
Second Time
.
9.
Click
Print
to print another test pattern.
10. Examine the disc after printing to see if further adjustment is needed.
When the ink density looks good, you are ready to print on your burned CD or DVD.
Parent topic:
Printing on a CD/DVD with Mac OS X
210