Epson XP-950 User Manual - Page 209
Adjusting CD/DVD Print Quality - Mac OS X, using. First
 |
View all Epson XP-950 manuals
Add to My Manuals
Save this manual to your list of manuals |
Page 209 highlights
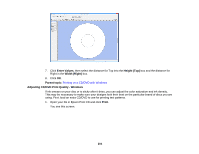
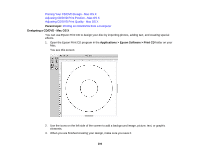
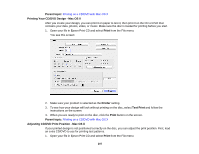
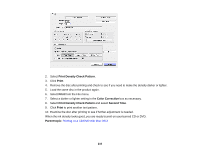
8. Click Value Entry, then select the distance for Top into the Top Space box and the distance for Right in the Right Space box. 9. Click OK. Parent topic: Printing on a CD/DVD with Mac OS X Adjusting CD/DVD Print Quality - Mac OS X If ink smears on your disc or is sticky after it dries, you can adjust the color saturation and ink density. This may be necessary to make sure your designs look their best on the particular brand of discs you are using. First, load an extra CD/DVD to use for printing test patterns. 1. Open your file in Epson Print CD and select Print from the File menu. You see this screen: 209
-
 1
1 -
2
-
3
-
4
-
5
-
6
-
7
-
8
-
9
-
10
-
11
-
12
-
13
-
14
-
15
-
16
-
17
-
18
-
19
-
20
-
21
-
22
-
23
-
24
-
25
-
26
-
27
-
28
-
29
-
30
-
31
-
32
-
33
-
34
-
35
-
36
-
37
-
38
-
39
-
40
-
41
-
42
-
43
-
44
-
45
-
46
-
47
-
48
-
49
-
50
-
51
-
52
-
53
-
54
-
55
-
56
-
57
-
58
-
59
-
60
-
61
-
62
-
63
-
64
-
65
-
66
-
67
-
68
-
69
-
70
-
71
-
72
-
73
-
74
-
75
-
76
-
77
-
78
-
79
-
80
-
81
-
82
-
83
-
84
-
85
-
86
-
87
-
88
-
89
-
90
-
91
-
92
-
93
-
94
-
95
-
96
-
97
-
98
-
99
-
100
-
101
-
102
-
103
-
104
-
105
-
106
-
107
-
108
-
109
-
110
-
111
-
112
-
113
-
114
-
115
-
116
-
117
-
118
-
119
-
120
-
121
-
122
-
123
-
124
-
125
-
126
-
127
-
128
-
129
-
130
-
131
-
132
-
133
-
134
-
135
-
136
-
137
-
138
-
139
-
140
-
141
-
142
-
143
-
144
-
145
-
146
-
147
-
148
-
149
-
150
-
151
-
152
-
153
-
154
-
155
-
156
-
157
-
158
-
159
-
160
-
161
-
162
-
163
-
164
-
165
-
166
-
167
-
168
-
169
-
170
-
171
-
172
-
173
-
174
-
175
-
176
-
177
-
178
-
179
-
180
-
181
-
182
-
183
-
184
-
185
-
186
-
187
-
188
-
189
-
190
-
191
-
192
-
193
-
194
-
195
-
196
-
197
-
198
-
199
-
200
-
201
-
202
-
203
-
 204
204 -
 205
205 -
 206
206 -
 207
207 -
 208
208 -
 209
209 -
 210
210 -
 211
211 -
 212
212 -
 213
213 -
 214
214 -
215
-
216
-
217
-
218
-
219
-
220
-
221
-
222
-
223
-
224
-
225
-
226
-
227
-
228
-
229
-
230
-
231
-
232
-
233
-
234
-
235
-
236
-
237
-
238
-
239
-
240
-
241
-
242
-
243
-
244
-
245
-
246
-
247
-
248
-
249
-
250
-
251
-
252
-
253
-
254
-
255
-
256
-
257
-
258
-
259
-
260
-
261
-
262
-
263
-
264
-
265
-
266
-
267
-
268
-
269
-
270
-
271
-
272
-
273
-
274
-
275
-
276
-
277
-
278
-
279
-
280
-
281
-
282
-
283
-
284
-
285
-
286
-
287
-
288
-
289
-
290
-
291
-
292
-
293
-
294
-
295
-
296
-
297
-
298
-
299
-
300
 |
 |

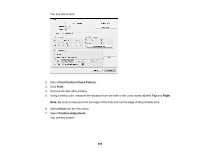
8.
Click
Value Entry
, then select the distance for Top into the
Top Space
box and the distance for
Right in the
Right Space
box.
9.
Click
OK
.
Parent topic:
Printing on a CD/DVD with Mac OS X
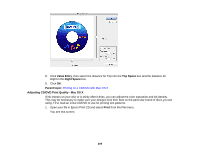
Adjusting CD/DVD Print Quality - Mac OS X
If ink smears on your disc or is sticky after it dries, you can adjust the color saturation and ink density.
This may be necessary to make sure your designs look their best on the particular brand of discs you are
using. First, load an extra CD/DVD to use for printing test patterns.
1.
Open your file in Epson Print CD and select
Print
from the File menu.
You see this screen:
209