Epson r-d1 User Manual - Page 42
Deleting Images, Deleting a single image, Formatting a memory card
 |
View all Epson r-d1 manuals
Add to My Manuals
Save this manual to your list of manuals |
Page 42 highlights
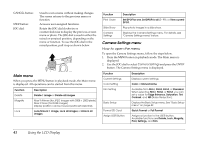
Deleting Images In playback mode, you can delete the currently displayed image or all images. Deleting a single image To delete the currently displayed image, follow the steps below. 1. Use the JOG dial to display the image you want to delete, and press the MENU button. The Main menu is displayed. 2. Select Delete and press the ENTER button. The Delete menu is displayed. 3. Confirm that Delete 1 image is highlighted, and press the ENTER button. The confirmation screen is displayed. 4. In the confirmation screen, use the JOG dial to select OK and press the ENTER button. Note: ❏ If you want to delete more images, display the next image by rotating the JOG dial in the unraised position. ❏ You cannot delete a locked image (displayed with the lock ( ) icon). Deleting all images 1. Press the MENU button in playback mode. The Main menu is displayed. 2. Select Delete and press the ENTER button. The Delete menu is displayed. 3. Raise the JOG dial. Use it to select Delete all images and press the ENTER button. The confirmation screen is displayed. 4. Select OK on the confirmation screen and press the ENTER button. Note: ❏ You cannot delete a locked images (displayed with the lock ( ) icon). For details, see "Locking Images" on page 38. ❏ When an SD memory card is locked, the message "Cannot delete. The SD card is write-protected." is displayed. Remove the card from the camera, then unlock the card and try again. Formatting a memory card Format a memory card when you want to erase all the data on the card or when a message on the LCD monitor instructs you to do so. To format a memory card, follow the steps below. 1. Use the JOG dial to select Format SD Card in the Camera Settings menu and press the ENTER button. The Format SD Card menu is displayed. 2. Select Quick Format or Full Format using the JOG dial, and press the ENTER button. The confirmation screen is displayed. 3. Select OK using the JOG dial, and press the ENTER button. The SD card formatting starts and the message "Formatting" is displayed. After the SD memory card is formatted, the screen returns to the Camera Settings menu. c Caution: ❏ You must format all memory cards in your camera before you use them. ❏ While formatting an SD memory card, do not take the card out of the camera. Note: ❏ When you format an SD memory card, all the data on the card is erased, including locked images. ❏ When an SD memory card is locked, the message "Cannot format. The SD card is write-protected." is displayed. Remove the card from the camera, then unlock the card and try again. 37 Viewing and Managing Your Photos
-
 1
1 -
2
-
3
-
4
-
5
-
6
-
7
-
8
-
9
-
10
-
11
-
12
-
13
-
14
-
15
-
16
-
17
-
18
-
19
-
20
-
21
-
22
-
23
-
24
-
25
-
26
-
27
-
28
-
29
-
30
-
31
-
32
-
33
-
34
-
35
-
36
-
 37
37 -
 38
38 -
 39
39 -
 40
40 -
 41
41 -
 42
42 -
 43
43 -
 44
44 -
 45
45 -
 46
46 -
 47
47 -
48
-
49
-
50
-
51
-
52
-
53
-
54
-
55
-
56
-
57
-
58
-
59
 |
 |
