Epson r-d1 User Manual - Page 47
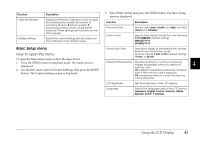
Basic Setup menu
 |
View all Epson r-d1 manuals
Add to My Manuals
Save this manual to your list of manuals |
Page 47 highlights
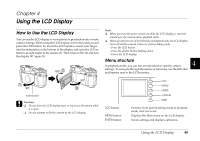
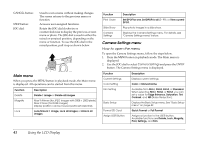
Function Calibrate Needles Initialize Settings Description Displays the Needle Calibration menu to adjust the following four needles: E (number of remaining photos), R (photo quality), E (remaining battery power), and A (white balance). These settings are indicated on the status gauge. Resets the current settings (except date and time settings) to their default values. Basic Setup menu How to open the menu To open the Basic Setup menu, follow the steps below. 1. Press the MENU button in playback mode. The Main menu is displayed. 2. Use the JOG dial to select Camera Settings, then press the ENTER button. The Camera Settings menu is displayed. 3. Select Basic Setup and press the ENTER button. The Basic Setup menu is displayed. 4 Function Description Time and Date Sets the date (year, month, and day) and time (hours and minutes). 4 Date Format Selects date display format from the following: YYYY/MM/DD (default setting) MM/DD/YYYY DD/MM/YYYY 4 Power Save Timer Selects the length of time before the camera enters Power Save Timer mode. Choices include 3 min, 5 min (default setting), 4 10 min, or 20 min. Sequential Numbering Specifies whether to continue numbering images sequentially when you replace a 4 memory card. On (default): sequential numbering continues even if the memory card is replaced. Off: numbering resists at 1 when the memory 4 card is replaced. LCD Brightness Language Sets the brightness of the LCD display. Selects the language used on the LCD menus: 4 Japanese, English, French, German, Italian, Spanish, Dutch, T-Chinese 4 4 4 Using the LCD Display 42
-
 1
1 -
2
-
3
-
4
-
5
-
6
-
7
-
8
-
9
-
10
-
11
-
12
-
13
-
14
-
15
-
16
-
17
-
18
-
19
-
20
-
21
-
22
-
23
-
24
-
25
-
26
-
27
-
28
-
29
-
30
-
31
-
32
-
33
-
34
-
35
-
36
-
37
-
38
-
39
-
40
-
41
-
 42
42 -
 43
43 -
 44
44 -
 45
45 -
 46
46 -
 47
47 -
 48
48 -
 49
49 -
 50
50 -
 51
51 -
 52
52 -
53
-
54
-
55
-
56
-
57
-
58
-
59
 |
 |
