Epson r-d1 User Manual - Addendum - firmware version 2.0 upgrade features. - Page 42
Calibrating the Status Gauge, Formatting the Memory Card
 |
View all Epson r-d1 manuals
Add to My Manuals
Save this manual to your list of manuals |
Page 42 highlights
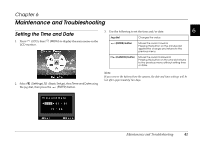
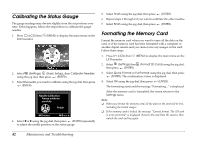
Calibrating the Status Gauge The gauge readings may deviate slightly from the set positions over time. If this happens, follow the steps below to calibrate the gauge needles. 1. Press (LCD) then (MENU) to display the main menu on the LCD monitor. 2. Select (Settings), (Basic Setup), then Calibrate Needles using the jog dial, then press (ENTER). 3. Select the needle you want to calibrate using the jog dial, then press (ENTER). Needle Calibration Please calibrate carefully. Finish S e lect B a c k 4. Select l or r using the jog dial, then press (ENTER) repeatedly to adjust the needle position on the status gauge. 5. Select Finish using the jog dial, then press (ENTER). 6. Repeat steps 2 through 4 if you want to calibrate the other needles. 7. Select Finish using the jog dial, then press (ENTER). Formatting the Memory Card Format the memory card when you want to erase all the data on the card, or if the memory card has been formatted with a computer or another digital camera and you cannot save any images on the card. Follow these steps: 1. Press (LCD) then (MENU) to display the main menu on the LCD monitor. 2. Select (Settings) then (Format SD Card) using the jog dial, then press (ENTER). 3. Select Quick Format or Full Format using the jog dial, then press (ENTER). The confirmation screen is displayed. 4. Select OK using the jog dial, then press (ENTER). The formatting starts and the message "Formatting..." is displayed. After the memory card is formatted, the screen returns to the Settings menu. Note: ❏ When you format the memory card, all the data on the card will be lost, including the locked images. ❏ If the memory card is locked, the message "Cannot format. The SD card is write-protected" is displayed. Remove the card from the camera, then unlock the card and try again. 42 Maintenance and Troubleshooting
-
 1
1 -
2
-
3
-
4
-
5
-
6
-
7
-
8
-
9
-
10
-
11
-
12
-
13
-
14
-
15
-
16
-
17
-
18
-
19
-
20
-
21
-
22
-
23
-
24
-
25
-
26
-
27
-
28
-
29
-
30
-
31
-
32
-
33
-
34
-
35
-
36
-
 37
37 -
 38
38 -
 39
39 -
 40
40 -
 41
41 -
 42
42 -
 43
43 -
 44
44 -
 45
45 -
 46
46 -
 47
47 -
48
-
49
-
50
-
51
-
52
-
53
-
54
 |
 |
