Foxconn P35A-S English manual - Page 26
BIOS Write Protect Jumper: WP_EN, Clear CMOS Jumper: CLR_CMOS
 |
View all Foxconn P35A-S manuals
Add to My Manuals
Save this manual to your list of manuals |
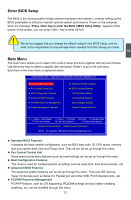
Page 26 highlights
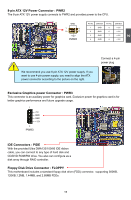
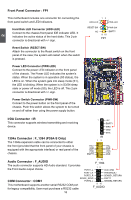
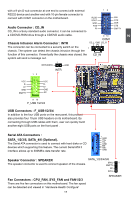
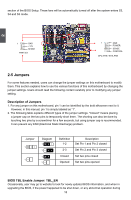
2 BIOS upgrading process, then the system will no longer be booted. With our BIOS TBL feature, you can get away from this worry. BIOS TBL is used to lock "Top Boot Block" of BIOS code. By using this function, the system still can boot even the previous BIOS upgrade failed. In addition, more helpfully, the system will show some information to tell you how to recover the BIOS. To acquire this function, please set the jumper with pin 2 and 3 closed. BIOS TBL 1 Disabled 2 (Default) 3 BIOS TBL 1 Enabled 2 3 TBL_EN BIOS Write Protect Jumper: WP_EN To protect the system BIOS from virus attack, there is a BIOS Write 1 BIOS write-protection mechanism provided. Unprotected 2 With pins 1 and 2 closed on a WP_EN jumper, the BIOS is (Default) 3 unprotected and can be flashed (or upgraded). Most of this cases happen when user wants to upgrade the BIOS. BIOS Write 1 With pins 2 and 3 closed, your BIOS code is fully protected Protected 2 and can not be modified, Virus such as CIH can do nothing (LOCK) 3 on your PC. WP_EN Clear CMOS Jumper: CLR_CMOS The motherboard uses CMOS RAM to store the basic hardware information (such as BIOS data, date, time information, hardware password...etc.). Clear CMOS data is the fast way to go back to factory default when the BIOS settings were mistakenly modified. The steps to clear CMOS data are : 1. Turn off the computer, unplug the power cord from the power outlet. 2. Remove jumper cap from pins 2 and 3, put it onto pins 1 and 2 to short them. This will clear CMOS data. 3. Return the setting to its original with pins 2 and 3 closed. 4. Plug in the power cord to your computer and turn it on. 5. Go to BIOS Setup to configure new system as described in next chapter. 1 Clear 2 3 Normal 1 2 (Default) 3 CLR_CMOS 19
-
 1
1 -
2
-
3
-
4
-
5
-
6
-
7
-
8
-
9
-
10
-
11
-
12
-
13
-
14
-
15
-
16
-
17
-
18
-
19
-
20
-
 21
21 -
 22
22 -
 23
23 -
 24
24 -
 25
25 -
 26
26 -
 27
27 -
 28
28 -
 29
29 -
 30
30 -
 31
31 -
32
-
33
-
34
-
35
-
36
-
37
-
38
-
39
-
40
-
41
-
42
-
43
-
44
-
45
-
46
-
47
-
48
-
49
-
50
-
51
-
52
-
53
-
54
-
55
-
56
-
57
-
58
-
59
-
60
-
61
-
62
-
63
-
64
-
65
-
66
-
67
-
68
-
69
-
70
-
71
-
72
-
73
-
74
-
75
-
76
-
77
-
78
-
79
-
80
-
81
-
82
-
83
-
84
-
85
-
86
-
87
-
88
-
89
-
90
-
91
-
92
-
93
-
94
-
95
-
96
-
97
-
98
-
99
-
100
-
101
-
102
-
103
-
104
-
105
-
106
-
107
-
108
-
109
-
110
-
111
-
112
-
113
-
114
-
115
-
116
-
117
 |
 |
