Fujitsu 5900C Getting Started Guide - Page 24
Appendix 1 - scanner troubleshoot
 |
UPC - 097564306945
View all Fujitsu 5900C manuals
Add to My Manuals
Save this manual to your list of manuals |
Page 24 highlights
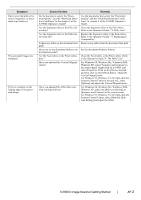
Appendix 1 TROUBLESHOOTING ■ Troubleshooting checklist Symptom Scanner does not turn on. Scanning does not start. Vertical lines appear in the scanned image. The scanned image shifts or is distorted. Quality of generated image is unsatisfactory. Multifeed* frequently occurs. *"Multifeed" is a phenomenon when two or more sheets of paper are fed simultaneously into the scanner. Check this item Remedy Have you pushed the power button on the front of the scanner? Have you pushed the main power switch at the back of the scanner? Is the AC power cable properly connected to the scanner? Are documents loaded correctly on the hopper? Is the ADF closed completely? Is the USB cable or SCSI cable properly connected? (When using the SCSI interface) Is SCSI ID set correctly? Does the Function Number Display indicate an alarm or an error? Does the alarm state remain displayed even after the scanner has been turned off and back on again? Is the glass dirty? Are the documents loaded correctly? Push the power button. Push the Main power switch of the scanner. Then push the power button. Correctly connect the AC power able to the scanner adapter. Disconnect the AC power cable, then connect it again. If this does not restore the power supply, contact the store where you purchased the scanner or an authorized FUJITSU scanner service provider. Load documents correctly on the hopper. Close the ADF completely. Correctly connect the cable. (When a USB hub is used, check the hub's power supply.) Set SCSI ID correctly by SCSI ID switch on rear of scanner. When the Function Number Display indicates an alarm or an error, refer to the "Chapter 6. TROUBLESHOOTING" in the fi-5900C Operator's Guide for removing the alarm or the error. Turn off and on the power button. If this does not eliminate the alarm state, contact the store where you purchased the scanner or an authorized FUJITSU scanner service provider. Clean the glass following the instructions in the Operator's Guide "4. Daily Care". Load the documents correctly. Are the glass or sheet guides (Black/ White reference area) clean? Do the documents satisfy the "Document Quality" and the "Multifeed Detection Conditions" in the chapter 7 of the fi-5900C Operator's Guide? Are the documents set properly in the hopper? Is the document stack loaded on the hopper thicker than 50mm (2 inch)? Are the Brake roller, the Separator roller or the Pad dirty? Are the Brake roller, the Separator roller or the Pad worn out? Have you set the document thickness on the Operator panel? Clean the dirty locations. Scan the documents that satisfy the "Document Quality" and the "Multifeed Detection Conditions" in the chapter 7 of the fi-5900C Operator's Guide. Fan the documents before scanning. Correctly align the document stack and load them on the hopper. Refer to " 2.6 Loading Document on Hopper" in the Operator's Guide for details. Reduce the number of sheets in the document stack to 50 mm (2 inch) thick or less. Clean the Brake roller, the Separator roller or the Pad. Refer to the Operator's Guide "4. Daily Care". Replace the Brake roller, Separator roller or the Pad. Refer to the Operator's Guide "5. Replacing the Pad". Set the document thickness thicker. AP-1
-
 1
1 -
2
-
3
-
4
-
5
-
6
-
7
-
8
-
9
-
10
-
11
-
12
-
13
-
14
-
15
-
16
-
17
-
18
-
 19
19 -
 20
20 -
 21
21 -
 22
22 -
 23
23 -
 24
24 -
 25
25 -
 26
26 -
 27
27 -
 28
28 -
 29
29 -
30
 |
 |
