Fujitsu 6010N Getting Started Guide - Page 11
Installing the Admin Tool - software
 |
UPC - 097564307683
View all Fujitsu 6010N manuals
Add to My Manuals
Save this manual to your list of manuals |
Page 11 highlights
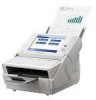
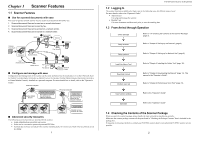
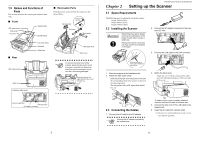
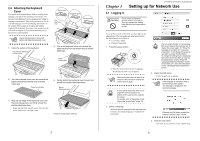
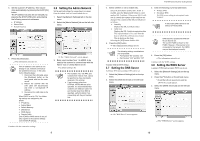
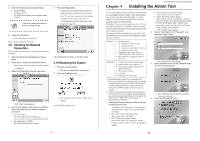
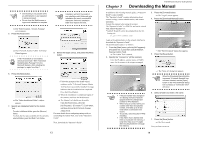
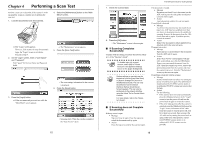
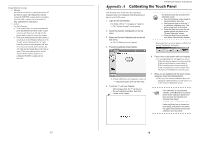
4. Enter the following numerical addresses: • Primary WINS • Secondary WINS If a WINS server setting is not required, enter "0.0.0.0". ATTENTION A Secondary WINS cannot be set without a Primary WINS. 5. Press the [Ping] button. ⇒ A ping test is performed and the results are displayed. If the result shows "Lost=0 (0% loss)", the network connection is functioning normally. For any other result, refer to "Checking Basic Network Operation with a Ping Test" (page 23). 5. Press the [OK] button. ⇒ The information entered is set. Next, check the network connection. 3.9 Checking the Network Connection The network connection may be checked by performing a ping test. 1. Select the [Network Settings] tab on the top menu. 2. Press the [ ] button on the left side menu. ⇒ Scroll the left side menu down until the [Ping] tab appears. 3. Select the [Ping] tab on the left side menu. After performing all settings, restart the system. 3.10 Restarting the System 1. Press the [Logout] button. ⇒ The restart confirmation screen appears. 2. Press the [Restart] button. ⇒ The "Ping" screen appears. 4. Enter the IP address, host name, or FQDN for the server to be used to check the network connection. • For an IP address The following format should be used xxx.xxx.xxx.xxx (xxx is a value from 0 to 255). • For a host name or FQDN Up to 255 characters may be used. ⇒ The scanner restarts, and the "Login" screen appears. Next, install the Admin Tool. 11 Chapter 4 fi-6010N Network Scanner Getting Started Installing the Admin Tool As well as operating via the touch panel, the administrator can configure scanner settings via the network interface. In order to do this, the Admin Tool, or Central Admin Console, must first be installed on a personal computer connected to the network. The Admin Tool can set one scanner at a time. The Central Admin Console can set multiple scanners at a time. For more details about the Central Admin Console, refer to the "Operator's Guide". This chapter provides a description of the Admin Tool. The information and procedure for installing the Admin Tool are as follows. Software • Operating system • Windows® XP SP2 or later • Windows Vista® • Windows Server® 2003 SP2 or later • Windows Server® 2008 • .NET Framework 2.0 SP1 or later, or .NET Framework 3.0 SP1 or later (*1) • Microsoft® Internet Explorer 6 SP2 or later (*2) Hardware • 32 MB or more of free memory space • 64 MB or more of free disk space • Any personal computer which runs the supported software • XGA monitor or better • LAN cable • Pointing device (e.g. mouse) *1: When installing the Admin Tool, confirm that .NET Framework is installed. If not already installed, a message will appear telling you to install .NET Framework from the Microsoft Web site. When installing .NET Framework, at least 280MB of additional free disk space is required. *2: Confirm that the latest security patch has been applied. If the latest patch has not been applied, downloading operations (such as manual download) may not be possible. For Windows® XP, "KB933566" must be applied to Microsoft® Internet Explorer. 1. Specify the scanner name as a URL in the web browser's location bar. According to the settings from "3.6 Setting the Admin Network" (page 9), the specified URL is as follows: • SSL is [Off], no port number change http://scanner_name or IP_address/ • SSL is [Off], port number change http://scanner_name or IP_address:port_number/ For port_number, number enter the changed port number • SSL is [On], no port number change https://scanner_name or IP_address/ • SSL is [On], port number change https://scanner_name or IP_address:port_number/ For port_number, enter the changed port number For SSL, the "Security Alert" window is displayed when connecting. Press the [Yes] button on the "Security Alert" window. ⇒ The "Login" screen appears. 2. Enter a "User Name" and "Password", and press the "Login" button. ⇒ The "Download" screen appears. 3. Press the [Next] button for the fi Network Scan- ner Admin Tool download. ⇒ The fi Network Scanner Admin Tool download screen appears. 4. Press the [Download] button. 12
-
 1
1 -
2
-
3
-
4
-
5
-
 6
6 -
 7
7 -
 8
8 -
 9
9 -
 10
10 -
 11
11 -
 12
12 -
 13
13 -
 14
14 -
 15
15 -
 16
16 -
17
-
18
-
19
-
20
-
21
 |
 |