Garmin GPS 60 Owner's Manual - Page 43
Creating and Using a Route, Routes, To create a route - software
 |
UPC - 753759043988
View all Garmin GPS 60 manuals
Add to My Manuals
Save this manual to your list of manuals |
Page 43 highlights
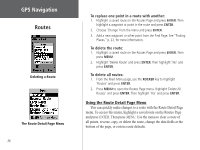
Creating and Using a Route A route gives you straight-line directions from one point to another, or from one point to several others. The GPS 60 can store fifty routes that contain up to 250 points each. You can create routes that include waypoints or points of interest with the Routes Page. With MapSource mapping software and your personal computer, you can create complex routes and transfer them to your GPS 60. Created routes are automatically saved in a list on the Routes Page. You can edit a route at any time. To create a route: 1. From the Main Menu Page, use the ROCKER key to highlight 'Routes' and press ENTER. 2. Highlight 'New' and press ENTER. 3. Highlight and press ENTER to add a waypoint or other point to your route. The Find page appears. 4. To add a waypoint, select ' Waypoints' and choose the waypoint you want to add to the route. To add other points, highlight the correct category and choose the point you want to add to the route. See "Finding Places," p. 22 for more information. Then highlight 'Use' and press ENTER. 5. Repeat steps 3 and 4 to add more points to your route. When you are finished adding points, highlight 'Navigate' and press ENTER to begin using the route, or press QUIT to exit and save the route on the Routes Page. GGPPSS NNaavvigigaatitoinon Routes The Routes Page Choose '' and locate the waypoint you want to add to the route. Then select 'Use.' 33
-
 1
1 -
2
-
3
-
4
-
5
-
6
-
7
-
8
-
9
-
10
-
11
-
12
-
13
-
14
-
15
-
16
-
17
-
18
-
19
-
20
-
21
-
22
-
23
-
24
-
25
-
26
-
27
-
28
-
29
-
30
-
31
-
32
-
33
-
34
-
35
-
36
-
37
-
 38
38 -
 39
39 -
 40
40 -
 41
41 -
 42
42 -
 43
43 -
 44
44 -
 45
45 -
 46
46 -
 47
47 -
 48
48 -
49
-
50
-
51
-
52
-
53
-
54
-
55
-
56
-
57
-
58
-
59
-
60
-
61
-
62
-
63
-
64
-
65
-
66
-
67
-
68
-
69
-
70
-
71
-
72
-
73
-
74
-
75
-
76
-
77
-
78
-
79
-
80
-
81
-
82
-
83
-
84
-
85
-
86
-
87
-
88
-
89
-
90
 |
 |
