Garmin eTrex Venture HC Owner's Manual - Page 29
Map Data, Changing the Zoom Range, Using Additional - phone
 |
UPC - 753759072872
View all Garmin eTrex Venture HC manuals
Add to My Manuals
Save this manual to your list of manuals |
Page 29 highlights
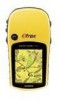
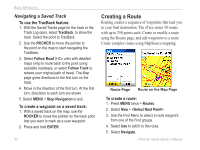
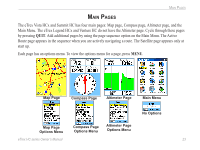
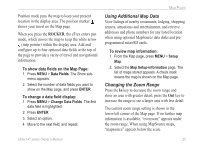
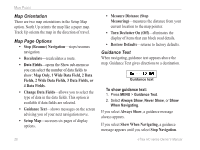
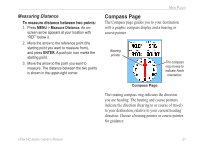
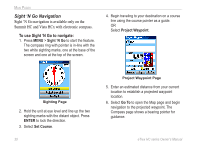
Position mode pans the map to keep your present location in the display area. The position marker shows your travel on the Map page. When you press the ROCKER, the eTrex enters pan mode, which moves the map to keep the white arrow (map pointer) within the display area. Add and configure up to four optional data fields at the top of the page to provide a varity of travel and navigational information. To show data fields on the Map Page: 1. Press MENU > Data Fields. The Show sub- menu appears. 2. Select the number of data fields you want to show on the Map page, and press ENTER. To change a data field display: 1. Press MENU > Change Data Fields. The first data field is highlighted. 2. Press ENTER. 3. Select an option. 4. Move to the next field, and repeat. Main Pages Using Additional Map Data View listings of nearby restaurants, lodging, shopping centers, attractions and entertainment, and retrieve addresses and phone numbers for any listed location when using optional MapSource data disks and preprogrammed microSD cards. To review map information: 1. From the Map page, press MENU > Setup Map. 2. Select the Map Setup-information page. The list of maps stored appears. A check mark means the map is shown on the Map page. Changing the Zoom Range Press the In key to decrease the zoom range and show an area with greater detail; press the Out key to increase the range to see a larger area with less detail. The current zoom range setting is shown in the lower-left corner of the Map page. If no further map information is available, "overzoom" appears under the zoom range. When using MapSource maps, "mapsource" appears below the scale. eTrex HC series Owner's Manual 25
-
 1
1 -
2
-
3
-
4
-
5
-
6
-
7
-
8
-
9
-
10
-
11
-
12
-
13
-
14
-
15
-
16
-
17
-
18
-
19
-
20
-
21
-
22
-
23
-
 24
24 -
 25
25 -
 26
26 -
 27
27 -
 28
28 -
 29
29 -
 30
30 -
 31
31 -
 32
32 -
 33
33 -
 34
34 -
35
-
36
-
37
-
38
-
39
-
40
-
41
-
42
-
43
-
44
-
45
-
46
-
47
-
48
-
49
-
50
-
51
-
52
-
53
-
54
 |
 |