Garmin eTrex Vista Cx Owner's Manual - Page 69
View Points, View Points on Map
 |
UPC - 753759049188
View all Garmin eTrex Vista Cx manuals
Add to My Manuals
Save this manual to your list of manuals |
Page 69 highlights
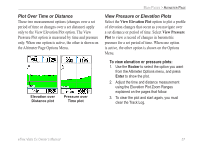
View Points You can scroll through a recorded elevation or pressure profile to view data for any point along the profile. When the red vertical and horizontal cross hairs are stopped at a location along the profile, the screen shows the elevation or pressure, time of day, and date the point was created. Red crosshairs View point for an altitude plot View point for a pressure plot eTrex Vista Cx Owner's Manual MAIN PAGES > ALTIMETER PAGE To use the View Points option: 1. Press the Menu key to open the Altimeter Page Options Menu. 2. Select View Pressure Plot or View Elevation Plot, and press Enter to open the Plot Page. 3. Press left or right on the Rocker to scroll the cross hairs across the profile. As the cross hairs move across the profile, the status window at the bottom of the page changes to show the date, time, and altitude or pressure for the point at the intersection. View Points on Map You can view the location of points on the Map Page. To view altitude points on the Map Page: 1. With the Altimeter Page open, use the Rocker to move the red crosshairs to the point you want to view. 2. Press Enter to show the altitude point on the map. The point is marked by the Map Pointer with location coordinates, the compass bearing and distance from your current location. 3. Press the Quit key to close. 59
-
 1
1 -
2
-
3
-
4
-
5
-
6
-
7
-
8
-
9
-
10
-
11
-
12
-
13
-
14
-
15
-
16
-
17
-
18
-
19
-
20
-
21
-
22
-
23
-
24
-
25
-
26
-
27
-
28
-
29
-
30
-
31
-
32
-
33
-
34
-
35
-
36
-
37
-
38
-
39
-
40
-
41
-
42
-
43
-
44
-
45
-
46
-
47
-
48
-
49
-
50
-
51
-
52
-
53
-
54
-
55
-
56
-
57
-
58
-
59
-
60
-
61
-
62
-
63
-
 64
64 -
 65
65 -
 66
66 -
 67
67 -
 68
68 -
 69
69 -
 70
70 -
 71
71 -
 72
72 -
 73
73 -
 74
74 -
75
-
76
-
77
-
78
-
79
-
80
-
81
-
82
-
83
-
84
-
85
-
86
-
87
-
88
-
89
-
90
-
91
-
92
-
93
-
94
-
95
-
96
-
97
-
98
-
99
-
100
-
101
-
102
-
103
-
104
-
105
-
106
-
107
-
108
-
109
-
110
-
111
-
112
 |
 |
