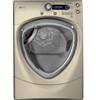
GE PFDS455GLMG Use and Care Manual - Page 11
About dryer features cont.. - profile dryer
 |
UPC - 084691226642
View all GE PFDS455GLMG manuals
Add to My Manuals
Save this manual to your list of manuals |
Page 11 highlights
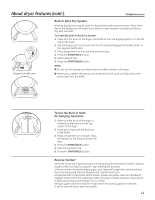
About dryer features (cont.). GEAppliances.com Engage the handle posts Built-In Rack Dry System A handy drying rack may be used for drying items such as tennis shoes. Place items flat on the drying rack and block such items as wool sweaters and delicate fabrics. Dry with low heat. To install the Built-In Rack Dry System 1. Make sure the drum of the dryer is oriented so the rack drying system is on the left side of the dryer. 2. Pull the drying rack screen out from the left side and engage the handle "posts" in the opposite baffle slots. 3. Place the garment on the rack and close the door. 4. Press the DRyER RACK button. 5. Select desired time. 6. Press the START/PAUSE button. NOTE: n Do not use this drying rack when there are other clothes in the dryer. n Make sure to detach the drying rack at the end of the cycle and fully retract the screen back into the baffle. To Use the Built-In Hook for Hanging Garments 1. Make sure the drum of the dryer is oriented so the hook is on the top center of the dryer. 2. Using your finger, pull the hook out of the baffle. 3. Hang the garment on a hanger, hang the hanger on the hook and close the door. 4. Press the DRyER RACK button. 5. Select the desired time. 6. Press the START/PAUSE button. Reverse Tumble™ All Profile front-load matching dryers are equipped with the Reverse Tumble™ feature, as part of the Duo Dry Plus system™. By reversing the direction of drum rotation during the drying cycle, your dryer will tangle the clothes load less, dry more evenly and improve drying times. Typical loads such as bed and bath mixed loads, where sheets, towels and pillow cases are laundered together, benefit from this capability. When the dryer reverses direction, there will be a slight pause and sound change. This is normal. All dryer cycles utilize this feature, except when the rack dry option is selected, in which case the drum does not tumble. 11
-
 1
1 -
2
-
3
-
4
-
5
-
 6
6 -
 7
7 -
 8
8 -
 9
9 -
 10
10 -
 11
11 -
 12
12 -
 13
13 -
 14
14 -
 15
15 -
 16
16 -
17
-
18
-
19
-
20
-
21
-
22
-
23
-
24
-
25
-
26
-
27
-
28
-
29
-
30
-
31
-
32
-
33
-
34
-
35
-
36
-
37
-
38
-
39
-
40
-
41
-
42
-
43
-
44
-
45
-
46
-
47
-
48
-
49
-
50
-
51
-
52
-
53
-
54
-
55
-
56
-
57
-
58
-
59
-
60
-
61
-
62
-
63
-
64
-
65
-
66
-
67
-
68
-
69
-
70
-
71
-
72
-
73
-
74
-
75
-
76
-
77
-
78
-
79
-
80
-
81
-
82
-
83
-
84
-
85
-
86
-
87
-
88
-
89
-
90
-
91
-
92
-
93
-
94
-
95
-
96
-
97
-
98
-
99
-
100
-
101
-
102
-
103
-
104
-
105
-
106
-
107
-
108
-
109
-
110
-
111
-
112
-
113
-
114
-
115
-
116
-
117
-
118
-
119
-
120
-
121
-
122
-
123
-
124
-
125
-
126
-
127
-
128
-
129
-
130
-
131
-
132
-
133
-
134
-
135
-
136
-
137
-
138
-
139
-
140
-
141
-
142
-
143
-
144
-
145
-
146
-
147
-
148
-
149
-
150
-
151
-
152
-
153
-
154
-
155
-
156
 |
 |
