Gigabyte GA-Z170X-SOC User Manual - Page 75
C-2. Configuring Legacy RAID ROM, MAIN MENU, Create RAID Volume
 |
View all Gigabyte GA-Z170X-SOC manuals
Add to My Manuals
Save this manual to your list of manuals |
Page 75 highlights
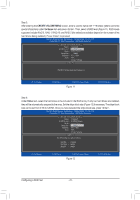
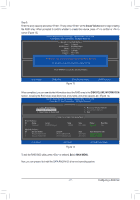
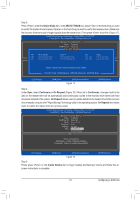
C-2. Configuring Legacy RAID ROM Enter the Intel® legacy RAID BIOS setup utility to configure a RAID array. Skip this step and proceed with the installation of Windows operating system for a non-RAID configuration. Step 1: After the POST memory test begins and before the operating system boot begins, look for a message which says "Press to enter Configuration Utility" (Figure 9). Press + to enter the RAID Configuration Utility. Intel(R) Rapid Storage Technology - Option ROM - 14.0.0.2209 Copyright (C) Intel Corporation. All Rights Reserved. RAID Volumes : None defined. Physical Devices : ID Device Model 1 Hitachi HDS72105 2 Hitachi HDS72105 Serial # JP1532ER04EJTK JP1532ER046AGK Size 465.7GB 465.7GB Type/Status(Vol ID) Non-RAID Disk Non-RAID Disk Press to enter Configuration Utility... Figure 9 Step 2: After you press + , the MAIN MENU screen will appear (Figure 10). Create RAID Volume If you want to create a RAID array, select Create RAID Volume in MAIN MENU and press . Intel(R) Rapid Storage Technology - Option ROM - 14.0.0.2209 Copyright (C) Intel Corporation. All Rights Reserved. 1. Create RAID Volume 2. Delete RAID Volume 3. Reset Disks to Non-RAID [ MAIN MENU ] 4. Recovery Volume Options 5. Acceleration Options 6. Exit RAID Volumes : None defined. Physical Deivces : ID Device Model 1 Hitachi HDS72105 2 Hitachi HDS72105 [ DISK/VOLUME INFORMATION ] Serial # JP1532ER04EJTK JP1532ER046AGK Size 465.7GB 465.7GB Type/Status(Vol ID) Non-RAID Disk Non-RAID Disk [hi]-Select [ESC]-Exit Figure 10 [ENTER]-Select Menu - 75 - Configuring a RAID Set
-
 1
1 -
2
-
3
-
4
-
5
-
6
-
7
-
8
-
9
-
10
-
11
-
12
-
13
-
14
-
15
-
16
-
17
-
18
-
19
-
20
-
21
-
22
-
23
-
24
-
25
-
26
-
27
-
28
-
29
-
30
-
31
-
32
-
33
-
34
-
35
-
36
-
37
-
38
-
39
-
40
-
41
-
42
-
43
-
44
-
45
-
46
-
47
-
48
-
49
-
50
-
51
-
52
-
53
-
54
-
55
-
56
-
57
-
58
-
59
-
60
-
61
-
62
-
63
-
64
-
65
-
66
-
67
-
68
-
69
-
 70
70 -
 71
71 -
 72
72 -
 73
73 -
 74
74 -
 75
75 -
 76
76 -
 77
77 -
 78
78 -
 79
79 -
 80
80 -
81
-
82
-
83
-
84
-
85
-
86
-
87
-
88
-
89
-
90
-
91
-
92
-
93
-
94
-
95
-
96
-
97
-
98
-
99
-
100
-
101
-
102
-
103
-
104
-
105
-
106
-
107
-
108
-
109
-
110
-
111
-
112
-
113
-
114
-
115
-
116
-
117
-
118
-
119
-
120
-
121
-
122
-
123
-
124
-
125
-
126
-
127
-
128
-
129
-
130
-
131
-
132
 |
 |
