Harman Kardon HK3350 Owners Manual - Page 9
Using, Preset, Buttons, Making, Recording
 |
View all Harman Kardon HK3350 manuals
Add to My Manuals
Save this manual to your list of manuals |
Page 9 highlights
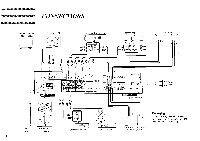
Using the Preset Buttons Your receiver allows you to store 30 station settings and quickly access them, using the 10 Preset buttons. The preset stations are designated by the number from 1 to 30. Any designation may be used for any AM or FM station, in whatever combination you choose. To enter a station in memory: 1. Tune to the desired station. 2. Be sure the Seek-Stereo setting is the one desired*. 3. Press the Memory switch. ("PRESET" will flash for about 3 seconds.) 4. With "PRESET" flashing, press the desired numbered Preset button. If a preset of "10" or greater is to be entered, enter the 1, 2 or 3 for 10, 20 or 30 first, then within 3 seconds enter the last digit (0 - 9). *NOTE: When a station is set in memory, the Seek-Stereo setting is also entered. Subsequently, each time a station is recalled using a Preset button, the tuner automatically switches to the original Seek-Stereo setting for that station. 3 5 •••• Memory 4 6 Seek-Stereo To change a preset station: Simply enter the new station. The old station is automatically erased. To access a preset station: Press the desired numbered Preset buttons. NOTE: Preset stations are stored indefinitely while the unit is connected to a live AC source, and for approximately 3 weeks when the unit is unplugged. Making a Recording When you select Video, Tuner, CD, Phono or Aux as your sound source, recordings may be made on tape deck 1 or 2, or both simultaneously. When making recordings on tape decks 1 and 2 simultaneously, you may listen directly to the source, or you may monitor tape deck 2. DO NOT monitor tape deck 1 during this procedure. If you wish to copy a tape, place it in deck 1, and press the Tape 1 button on your receiver. You may then record the tape using tape deck 2. Tapel/Copy Tape2/Mon. NOTE 1: To turn off the Tape 1 selection, press either Video, Tuner, CD, Phono or Aux. To turn off the Tape 2, press Tape 2 again. NOTE 2: To use a 3-head tape deck that allows monitoring of the actual recording while it is in process, you must connect it to TAPE 2 jacks. Pressing Tape 1 will switch off the source. 7
-
 1
1 -
2
-
3
-
 4
4 -
 5
5 -
 6
6 -
 7
7 -
 8
8 -
 9
9 -
 10
10 -
 11
11 -
 12
12 -
 13
13 -
 14
14 -
15
-
16
-
17
-
18
-
19
-
20
-
21
-
22
-
23
-
24
-
25
-
26
-
27
-
28
-
29
-
30
-
31
-
32
-
33
-
34
-
35
-
36
-
37
-
38
-
39
-
40
-
41
-
42
-
43
-
44
-
45
-
46
-
47
-
48
 |
 |
