HP 11642 HP Rack Options Installation Guide for the 11000 G2 Series Rack and t - Page 14
external washers with two M4 nuts on the inside of the shelf.
 |
View all HP 11642 manuals
Add to My Manuals
Save this manual to your list of manuals |
Page 14 highlights
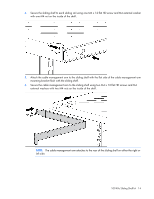
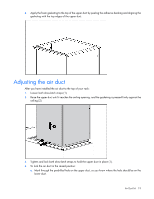
4. Secure the sliding shelf to each sliding rail using one M4 x 12 flat HD screw and M4 external washer with one M4 nut on the inside of the shelf. 5. Attach the cable management arm to the sliding shelf with the flat side of the cable management arm mounting bracket flush with the sliding shelf. 6. Secure the cable management arm to the sliding shelf using two M4 x 12 flat HD screws and M4 external washers with two M4 nuts on the inside of the shelf. NOTE: The cable management arm attaches to the rear of the sliding shelf on either the right or left side. 100 Kilo Sliding Shelf kit 14
-
 1
1 -
2
-
3
-
4
-
5
-
6
-
7
-
8
-
 9
9 -
 10
10 -
 11
11 -
 12
12 -
 13
13 -
 14
14 -
 15
15 -
 16
16 -
 17
17 -
 18
18 -
 19
19 -
20
-
21
-
22
-
23
-
24
-
25
-
26
-
27
-
28
-
29
-
30
-
31
-
32
-
33
-
34
-
35
-
36
-
37
-
38
-
39
-
40
-
41
-
42
-
43
-
44
-
45
-
46
-
47
-
48
-
49
-
50
-
51
-
52
-
53
-
54
-
55
-
56
-
57
-
58
-
59
-
60
-
61
-
62
-
63
-
64
-
65
-
66
-
67
-
68
-
69
-
70
-
71
-
72
-
73
-
74
-
75
-
76
-
77
-
78
-
79
-
80
-
81
-
82
-
83
-
84
-
85
-
86
-
87
-
88
-
89
-
90
-
91
-
92
-
93
-
94
-
95
-
96
-
97
 |
 |

100 Kilo Sliding Shelf kit
14
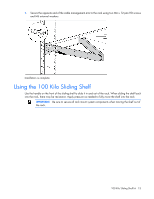
4.
Secure the sliding shelf to each sliding rail using one M4 x 12 flat HD screw and M4 external washer
with one M4 nut on the inside of the shelf.
5.
Attach the cable management arm to the sliding shelf with the flat side of the cable management arm
mounting bracket flush with the sliding shelf.
6.
Secure the cable management arm to the sliding shelf using two M4 x 12 flat HD screws and M4
external washers with two M4 nuts on the inside of the shelf.
NOTE:
The cable management arm attaches to the rear of the sliding shelf on either the right or
left side.