HP 11642 HP Rack Options Installation Guide for the 11000 G2 Series Rack and t - Page 26
Baying kit, About this device, Kit contents, Required tool, Installing the baying kit
 |
View all HP 11642 manuals
Add to My Manuals
Save this manual to your list of manuals |
Page 26 highlights
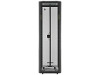
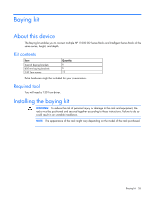
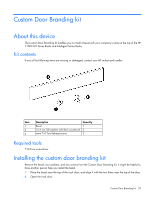
Baying kit About this device The Baying kit enables you to connect multiple HP 11000 G2 Series Racks and Intelligent Series Racks of the same series, height, and depth. Kit contents Item 24-inch baying brackets 600-mm baying brackets T-30 Torx screws Quantity 6 6 15 Extra hardware might be included for your convenience. Required tool You will need a T-30 Torx driver. Installing the baying kit WARNING: To reduce the risk of personal injury or damage to the rack and equipment, the racks must be positioned and secured together according to these instructions. Failure to do so could result in an unstable installation. NOTE: The appearance of the rack might vary depending on the model of the rack purchased. Baying kit 26
-
 1
1 -
2
-
3
-
4
-
5
-
6
-
7
-
8
-
9
-
10
-
11
-
12
-
13
-
14
-
15
-
16
-
17
-
18
-
19
-
20
-
 21
21 -
 22
22 -
 23
23 -
 24
24 -
 25
25 -
 26
26 -
 27
27 -
 28
28 -
 29
29 -
 30
30 -
 31
31 -
32
-
33
-
34
-
35
-
36
-
37
-
38
-
39
-
40
-
41
-
42
-
43
-
44
-
45
-
46
-
47
-
48
-
49
-
50
-
51
-
52
-
53
-
54
-
55
-
56
-
57
-
58
-
59
-
60
-
61
-
62
-
63
-
64
-
65
-
66
-
67
-
68
-
69
-
70
-
71
-
72
-
73
-
74
-
75
-
76
-
77
-
78
-
79
-
80
-
81
-
82
-
83
-
84
-
85
-
86
-
87
-
88
-
89
-
90
-
91
-
92
-
93
-
94
-
95
-
96
-
97
 |
 |
Baying kit 26
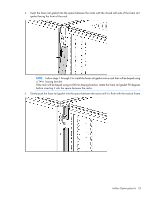
Baying kit
About this device
The Baying kit enables you to connect multiple HP 11000 G2 Series Racks and Intelligent Series Racks of the
same series, height, and depth.
Kit contents
Item
Quantity
24-inch baying brackets
6
600-mm baying brackets
6
T-30 Torx screws
15
Extra hardware might be included for your convenience.
Required tool
You will need a T-30 Torx driver.
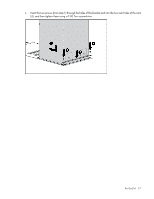
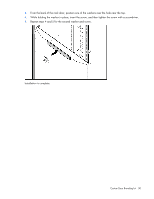
Installing the baying kit
WARNING:
To reduce the risk of personal injury or damage to the rack and equipment, the
racks must be positioned and secured together according to these instructions. Failure to do so
could result in an unstable installation.
NOTE:
The appearance of the rack might vary depending on the model of the rack purchased.