HP 11642 HP Rack Options Installation Guide for the 11000 G2 Series Rack and t - Page 62
To reduce the risk of personal injury or damage to the equipment, be sure
 |
View all HP 11642 manuals
Add to My Manuals
Save this manual to your list of manuals |
Page 62 highlights
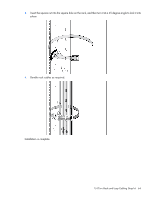
2. Slide the rack into its final location. 3. Raise the rack by lowering the leveling feet, raising the casters approximately 6.4 mm (0.25 in) off the floor. 4. Install one stabilizer foot on each side of the front stabilizer mount (1) by inserting and partially tightening one M8 x 30-mm bolt and washer on each foot (2). 5. Fully seat each stabilizer foot to the front stabilizer mount, and tighten the bolts from step 4. 6. Lower the rack so that the full weight of the rack rests on the rear leveling feet and the front stabilizer feet. WARNING: To reduce the risk of personal injury or damage to the equipment, be sure that: • The rear leveling feet are extended to the floor. • The full weight of the rack rests on the rear leveling feet and front stabilizer feet. Installation is complete. Heavy Duty Stabilizer kit 62
-
 1
1 -
2
-
3
-
4
-
5
-
6
-
7
-
8
-
9
-
10
-
11
-
12
-
13
-
14
-
15
-
16
-
17
-
18
-
19
-
20
-
21
-
22
-
23
-
24
-
25
-
26
-
27
-
28
-
29
-
30
-
31
-
32
-
33
-
34
-
35
-
36
-
37
-
38
-
39
-
40
-
41
-
42
-
43
-
44
-
45
-
46
-
47
-
48
-
49
-
50
-
51
-
52
-
53
-
54
-
55
-
56
-
 57
57 -
 58
58 -
 59
59 -
 60
60 -
 61
61 -
 62
62 -
 63
63 -
 64
64 -
 65
65 -
 66
66 -
 67
67 -
68
-
69
-
70
-
71
-
72
-
73
-
74
-
75
-
76
-
77
-
78
-
79
-
80
-
81
-
82
-
83
-
84
-
85
-
86
-
87
-
88
-
89
-
90
-
91
-
92
-
93
-
94
-
95
-
96
-
97
 |
 |
