HP 11642 HP Rack Options Installation Guide for the 11000 G2 Series Rack and t - Page 21
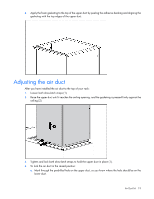
and then tighten them using a T-30 Torx screwdriver.
 |
View all HP 11642 manuals
Add to My Manuals
Save this manual to your list of manuals |
Page 21 highlights
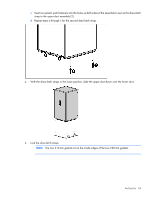
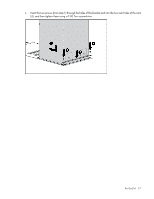
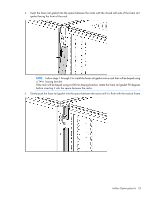
4. Insert the two screws (from step 1) through the holes of the bracket and into the two rear holes of the rack (3), and then tighten them using a T-30 Torx screwdriver. Air Duct kit 21
-
 1
1 -
2
-
3
-
4
-
5
-
6
-
7
-
8
-
9
-
10
-
11
-
12
-
13
-
14
-
15
-
 16
16 -
 17
17 -
 18
18 -
 19
19 -
 20
20 -
 21
21 -
 22
22 -
 23
23 -
 24
24 -
 25
25 -
 26
26 -
27
-
28
-
29
-
30
-
31
-
32
-
33
-
34
-
35
-
36
-
37
-
38
-
39
-
40
-
41
-
42
-
43
-
44
-
45
-
46
-
47
-
48
-
49
-
50
-
51
-
52
-
53
-
54
-
55
-
56
-
57
-
58
-
59
-
60
-
61
-
62
-
63
-
64
-
65
-
66
-
67
-
68
-
69
-
70
-
71
-
72
-
73
-
74
-
75
-
76
-
77
-
78
-
79
-
80
-
81
-
82
-
83
-
84
-
85
-
86
-
87
-
88
-
89
-
90
-
91
-
92
-
93
-
94
-
95
-
96
-
97
 |
 |

Air Duct kit 21
4.
Insert the two screws (from step 1) through the holes of the bracket and into the two rear holes of the rack
(3), and then tighten them using a T-30 Torx screwdriver.