HP 11642 HP Rack Options Installation Guide for the 11000 G2 Series Rack and t - Page 75
depending on the floor layout to the front and rear of each rack set., Place the panel onto the rack
 |
View all HP 11642 manuals
Add to My Manuals
Save this manual to your list of manuals |
Page 75 highlights
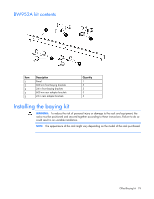
1. Remove the front and rear doors. 2. Remove the side panels (if present between the racks). 3. Position the racks side by side, ensuring that the feet of the racks are on solid flooring (no cracks or openings). 4. Place the panel onto the rack, and then place the rear brackets onto the panel. 5. Using two T-30 Torx screws in each bracket, attach three baying brackets (either 24-inch or 600-mm, depending on the floor layout) to the front and rear of each rack set. Offset Baying kit 75
-
 1
1 -
2
-
3
-
4
-
5
-
6
-
7
-
8
-
9
-
10
-
11
-
12
-
13
-
14
-
15
-
16
-
17
-
18
-
19
-
20
-
21
-
22
-
23
-
24
-
25
-
26
-
27
-
28
-
29
-
30
-
31
-
32
-
33
-
34
-
35
-
36
-
37
-
38
-
39
-
40
-
41
-
42
-
43
-
44
-
45
-
46
-
47
-
48
-
49
-
50
-
51
-
52
-
53
-
54
-
55
-
56
-
57
-
58
-
59
-
60
-
61
-
62
-
63
-
64
-
65
-
66
-
67
-
68
-
69
-
 70
70 -
 71
71 -
 72
72 -
 73
73 -
 74
74 -
 75
75 -
 76
76 -
 77
77 -
 78
78 -
 79
79 -
 80
80 -
81
-
82
-
83
-
84
-
85
-
86
-
87
-
88
-
89
-
90
-
91
-
92
-
93
-
94
-
95
-
96
-
97
 |
 |

Offset Baying kit 75
1.
Remove the front and rear doors.
2.
Remove the side panels (if present between the racks).
3.
Position the racks side by side, ensuring that the feet of the racks are on solid flooring (no cracks or
openings).
4.
Place the panel onto the rack, and then place the rear brackets onto the panel.
5.
Using two T-30 Torx screws in each bracket, attach three baying brackets (either 24-inch or 600-mm,
depending on the floor layout) to the front and rear of each rack set.