HP 11kVA 400 Volt IEC309 16A 3-Phase Input 18xC13/3xC19 HP Monitored Power Dis - Page 20
Installing the PDU in a Rack Cabinet, Horizontal Installation
 |
View all HP 11kVA 400 Volt IEC309 16A 3-Phase Input 18xC13/3xC19 manuals
Add to My Manuals
Save this manual to your list of manuals |
Page 20 highlights
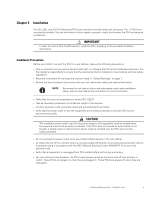
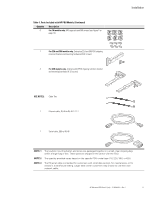
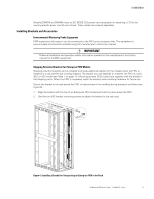
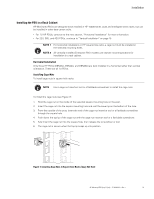
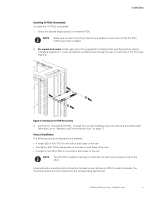
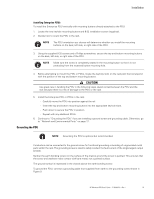
Installation Installing the PDU in a Rack Cabinet HP Monitored PDUs are designed to be installed in HP 10000 series racks and Intelligent series racks, but can be installed in other data center racks. l For 1U HP PDUs, continue to the next section, "Horizontal Installation" for more information. l For 22U, 36U, and 42U PDUs, continue to "Vertical Installation" on page 15. NOTE 1 For horizontal installations in HP square-hole racks, a cage nut must be installed in the selected mounting holes. NOTE 2 All vertically installed Enterprise PDU models use keyhole mounting buttons for installation in a rack cabinet. Horizontal Installation Only three HP PDUs (D9N43A, D9N44A, and D9N46A) are best installed in a horizontal rather than vertical orientation. These are all 1U PDUs. Installing Cage Nuts To install cage nuts in square-hole racks: NOTE Use a cage nut insertion tool or a flat-blade screwdriver to install the cage nuts. To install the cage nuts (see Figure 7): 1. Hold the cage nut on the inside of the selected square mounting hole on the post. 2. Insert the cage nut into the square mounting hole and rest the lower lip on the bottom of the hole. 3. From the outside of the post, insert the end of the cage nut insertion tool or a flat-blade screwdriver through the square hole. 4. Push down the top lip of the cage nut with the cage nut insertion tool or a flat-blade screwdriver. 5. Fully insert the cage nut into the square hole, then release the screwdriver or tool. 6. The cage nut is secure when the top lip snaps up into position. I Figure 7. Installing Cage Nuts in Square-hole Racks (Cage Nut Tool) HP Monitored PDU User's Guide P-164000281-Rev 1 14
-
 1
1 -
2
-
3
-
4
-
5
-
6
-
7
-
8
-
9
-
10
-
11
-
12
-
13
-
14
-
 15
15 -
 16
16 -
 17
17 -
 18
18 -
 19
19 -
 20
20 -
 21
21 -
 22
22 -
 23
23 -
 24
24 -
 25
25 -
26
-
27
-
28
-
29
-
30
-
31
-
32
-
33
-
34
-
35
-
36
-
37
-
38
-
39
-
40
-
41
-
42
-
43
-
44
-
45
-
46
-
47
-
48
-
49
-
50
-
51
-
52
-
53
-
54
-
55
-
56
-
57
-
58
-
59
-
60
-
61
-
62
-
63
-
64
-
65
-
66
-
67
-
68
-
69
-
70
-
71
-
72
-
73
-
74
-
75
-
76
-
77
-
78
-
79
-
80
-
81
-
82
-
83
-
84
-
85
-
86
-
87
-
88
-
89
-
90
-
91
-
92
-
93
-
94
-
95
-
96
-
97
-
98
-
99
-
100
-
101
-
102
-
103
-
104
-
105
-
106
-
107
-
108
-
109
-
110
-
111
-
112
-
113
-
114
-
115
-
116
-
117
-
118
-
119
-
120
 |
 |
