HP 11kVA HP Monitored Power Distribution Unit User Guide - Page 56
Accessing the Web Interface, Login, Cancel, NOTE 1
 |
View all HP 11kVA manuals
Add to My Manuals
Save this manual to your list of manuals |
Page 56 highlights
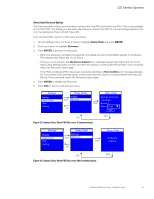
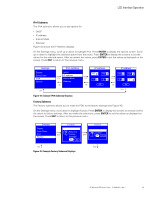
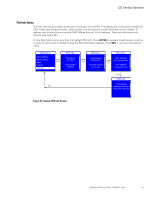
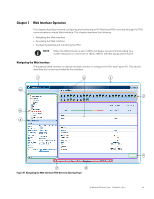
Web Interface Operation Table 8. Web Interface Region Descriptions (Continued) Area Description 8 - PDU Information This panel displays identification information for the PDU that is providing data. The data fields include information about the PDU, including a model description, part number, serial number and the current PDU firmware version in use. NOTE For daisy-chained PDUs, you can select either PDU 0 and PDU 1 data. 9- Active Alarms Menu Selection 10 - Menu Bar This indicator alerts you to the presence of currently active system alarms. It is in the menu hierarchy. When alarms are active, the text for Active Alarms appears as red. Selecting Active Alarms opens the Active Alarms page and displays the current active alarms. The menu bar on the left panel contains links to pages for configuring the system or managing and monitoring the PDU. The menu hierarchy is expandable and collapsible. You can move the menu bar out of view using the horizontal scrolling tab at the bottom of the page. Click any selection in the menu bar to retrieve PDU performance data, review operation log information, or retrieve system or network configuration settings. The data on the selected page is presented in table format. NOTE 1 The Web interface language is configurable. English and Japanese are provided. NOTE 2 The data that displays on the Web interface depends on the PDU model you are using. The examples shown represent typical data displays reported from a single model. NOTE 3 The Web interface supports Microsoft Internet Explorer 8.0 and greater, Firefox (installed on Linux or Windows), and Google Chrome. NOTE 4 The minimum resolution for the Web interface is 1024x768. Accessing the Web Interface The Web interface can be accessed using a standard Web browser. NOTE The PDU defaults to using DHCP when delivered. If you are unable to connect to the PDU through the network connection with this default address, change the IP address using the Serial interface before using any of the network interfaces. See "Serial Interface Operation" on page 73 for more information. To access the Web interface: 1. Open the Web browser. 2. Enter a new IP address or select the previously entered IP address of the PDU from the URL address drop list. The Authentication dialog displays. 3. Enter a valid user name and password in the authentication dialog box (see Figure 48). Click Login to continue or Cancel to exit. NOTE The default user name is "admin" and the default password is "admin." HP Monitored PDU User's Guide P-164000281-Rev 1 50
-
 1
1 -
2
-
3
-
4
-
5
-
6
-
7
-
8
-
9
-
10
-
11
-
12
-
13
-
14
-
15
-
16
-
17
-
18
-
19
-
20
-
21
-
22
-
23
-
24
-
25
-
26
-
27
-
28
-
29
-
30
-
31
-
32
-
33
-
34
-
35
-
36
-
37
-
38
-
39
-
40
-
41
-
42
-
43
-
44
-
45
-
46
-
47
-
48
-
49
-
50
-
 51
51 -
 52
52 -
 53
53 -
 54
54 -
 55
55 -
 56
56 -
 57
57 -
 58
58 -
 59
59 -
 60
60 -
 61
61 -
62
-
63
-
64
-
65
-
66
-
67
-
68
-
69
-
70
-
71
-
72
-
73
-
74
-
75
-
76
-
77
-
78
-
79
-
80
-
81
-
82
-
83
-
84
-
85
-
86
-
87
-
88
-
89
-
90
-
91
-
92
-
93
-
94
-
95
-
96
-
97
-
98
-
99
-
100
-
101
-
102
-
103
-
104
-
105
-
106
-
107
-
108
-
109
-
110
-
111
-
112
-
113
-
114
-
115
-
116
-
117
-
118
-
119
-
120
 |
 |