HP 2500c HP 2500C Professional Series Color Printer Network Guide - Page 14
Windows 95, 98 or NT 4.0 (Peer-to-Peer), Step 2 - Install HP 2500C/CM Printer Software - driver windows 7
 |
View all HP 2500c manuals
Add to My Manuals
Save this manual to your list of manuals |
Page 14 highlights
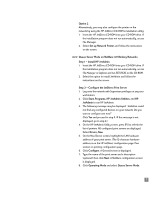
4.3.3 Windows 95, 98 or NT 4.0 (Peer-to-Peer) There are 2 methods to configure the printer onto the network. Option 1 Step 1 - Install HP JetAdmin 1. Insert the HP JetDirect CD-ROM into your CD-ROM drive. If the installation program does not run automatically, access File Manager or Explorer and run SETUP.EXE on the CD-ROM. 2. Select the option to install JetAdmin and follow the instructions on the screen. Step 2 - Install HP 2500C/CM Printer Software 1. If you are running Windows NT 4.0, log onto the computer as system administrator. Insert the Starter CD or PostScript CD into your CD-ROM drive. If the installation program does not run automatically, access File Manager or Explorer and run SETUP.EXE on the CD-ROM. 2. When prompted to select Local Printer or Network Printer, select Local Printer. 3. If you have previously installed JetAdmin and have configured a JetDirect Port for the print server, choose the corresponding port. Otherwise, select LPT 1 and go to Step 3. Step 3 - Associate Printer Software with JetDirect Port 1. In the Printers Folder select HP 2500C/CM Printer, right click the mouse and select Properties. 2. For Windows 95/98, select Details tab, click Add Port, click Other select HP JetDirect Port and click OK. For Windows NT 4.0, go to the Ports tab, select Add Port, and configure the type of Port Monitor you wish to use for this shared printer, such as HP JetDirect Port and click OK. 3. Follow the instructions on the screen to configure your printer. 4. Be sure to set up this printer so that it is "shared". Option 2 (for PCL3 driver only): Alternatively, you may also configure the printer on the network by using the HP JetDirect CD-ROM's installation utility: 1. Insert the HP JetDirect CD-ROM into your CD-ROM drive. If the installation program does not run automatically, access File Manager or Explorer and run SETUP.EXE on the CD-ROM. 2. Select Set up Network Printer and follow the instructions on the screen. 11
-
 1
1 -
2
-
3
-
4
-
5
-
6
-
7
-
8
-
 9
9 -
 10
10 -
 11
11 -
 12
12 -
 13
13 -
 14
14 -
 15
15 -
 16
16 -
 17
17 -
 18
18 -
 19
19 -
20
 |
 |
