HP 3700 HP Color LaserJet 3550 and 3700 series - User Guide - Page 95
Options for binding 2-sided printing jobs, Manual 2-sided printing
 |
UPC - 808736551106
View all HP 3700 manuals
Add to My Manuals
Save this manual to your list of manuals |
Page 95 highlights
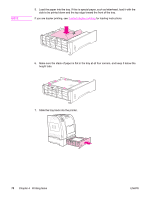
NOTE NOTE NOTE NOTE NOTE To enable or disable 2-sided printing from the printer control panel Changing settings for 2-sided printing through the printer control panel affects all print jobs. Whenever possible, change settings for 2-sided printing through your software application or printer driver. 1. Press MENU to enter the MENUS. 2. Press to highlight Configure Device. 3. Press to select Configure Device. 4. Press to select PRINTING. 5. Press to highlight DUPLEX. 6. Press to select DUPLEX. 7. Press or to select ON to enable 2-sided printing or OFF to disable 2-sided printing. 8. Press to set the value. 9. Press MENU to return to the Ready state. 10. Select 2-sided printing from your software application or printer driver, if possible. To select 2-sided printing from the printer driver, the driver must first be properly configured. (For instructions, see the online Help for the printer driver.) Options for binding 2-sided printing jobs Before printing a 2-sided document, use the printer driver to choose the edge on which you will bind your finished document. Long-edge or book binding is the conventional layout used in book binding. Short-edge or tablet binding is the typical calendar binding. The default binding setting is to bind on the long edge when the page is set up for portrait orientation. To change to short-edge binding, click the Flip Pages Up check box. Manual 2-sided printing The HP Color LaserJet 3550 series printer does not have automatic 2-sided (duplex) printing. If you want to print on two sides (duplex) on paper other than the supported sizes or weights (for example, paper heavier than 105 g/m2 (28 lb) or very thin paper), or if your printer does not support automatic 2-sided printing, you will have to go to the printer and reinsert the paper manually after the first side has printed. You will also have to reinsert the paper manually if you select either Correct Order for Rear Bin or Correct Order for Straight Paper Path in the printer driver. Follow the instructions in the printer driver. If you are using card stock or heavy paper, select Correct Order for Rear Bin in the printer driver to avoid jams. Open the lower rear door (rear output bin). Damaged or previously used paper can cause paper jams and should not be used. ENWW 2-sided (duplex) printing 83
-
 1
1 -
2
-
3
-
4
-
5
-
6
-
7
-
8
-
9
-
10
-
11
-
12
-
13
-
14
-
15
-
16
-
17
-
18
-
19
-
20
-
21
-
22
-
23
-
24
-
25
-
26
-
27
-
28
-
29
-
30
-
31
-
32
-
33
-
34
-
35
-
36
-
37
-
38
-
39
-
40
-
41
-
42
-
43
-
44
-
45
-
46
-
47
-
48
-
49
-
50
-
51
-
52
-
53
-
54
-
55
-
56
-
57
-
58
-
59
-
60
-
61
-
62
-
63
-
64
-
65
-
66
-
67
-
68
-
69
-
70
-
71
-
72
-
73
-
74
-
75
-
76
-
77
-
78
-
79
-
80
-
81
-
82
-
83
-
84
-
85
-
86
-
87
-
88
-
89
-
 90
90 -
 91
91 -
 92
92 -
 93
93 -
 94
94 -
 95
95 -
 96
96 -
 97
97 -
 98
98 -
 99
99 -
 100
100 -
101
-
102
-
103
-
104
-
105
-
106
-
107
-
108
-
109
-
110
-
111
-
112
-
113
-
114
-
115
-
116
-
117
-
118
-
119
-
120
-
121
-
122
-
123
-
124
-
125
-
126
-
127
-
128
-
129
-
130
-
131
-
132
-
133
-
134
-
135
-
136
-
137
-
138
-
139
-
140
-
141
-
142
-
143
-
144
-
145
-
146
-
147
-
148
-
149
-
150
-
151
-
152
-
153
-
154
-
155
-
156
-
157
-
158
-
159
-
160
-
161
-
162
-
163
-
164
-
165
-
166
-
167
-
168
-
169
-
170
-
171
-
172
-
173
-
174
-
175
-
176
-
177
-
178
-
179
-
180
-
181
-
182
-
183
-
184
-
185
-
186
-
187
-
188
-
189
-
190
-
191
-
192
-
193
-
194
-
195
-
196
-
197
-
198
-
199
-
200
-
201
-
202
-
203
-
204
-
205
-
206
-
207
-
208
-
209
-
210
-
211
-
212
-
213
-
214
-
215
-
216
-
217
-
218
-
219
-
220
-
221
-
222
-
223
-
224
-
225
-
226
-
227
-
228
-
229
-
230
-
231
-
232
-
233
-
234
-
235
-
236
-
237
-
238
-
239
-
240
-
241
-
242
-
243
-
244
-
245
-
246
-
247
-
248
-
249
-
250
 |
 |
