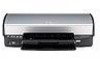
HP 5940 User Guide - Page 75
Estimated Ink Level, Print Cartridge Information, Print cartridge problem message - printer cartridge error
 |
View all HP 5940 manuals
Add to My Manuals
Save this manual to your list of manuals |
Page 75 highlights
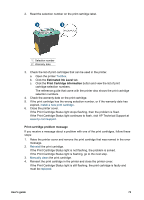
2. Read the selection number on the print cartridge label. 1 Selection number 2 Warranty date 3. Check the list of print cartridges that can be used in the printer. a. Open the printer Toolbox. b. Click the Estimated Ink Level tab. c. Click the Print Cartridge Information button and view the list of print cartridge selection numbers. The reference guide that came with the printer also shows the print cartridge selection numbers. 4. Check the warranty date on the print cartridge. 5. If the print cartridge has the wrong selection number, or if the warranty date has expired, install a new print cartridge. 6. Close the printer cover. If the Print Cartridge Status light stops flashing, then the problem is fixed. If the Print Cartridge Status light continues to flash, visit HP Technical Support at www.hp.com/support. Print cartridge problem message If you receive a message about a problem with one of the print cartridges, follow these steps: 1. Raise the printer cover and remove the print cartridge that was named in the error message. 2. Reinstall the print cartridge. If the Print Cartridge Status light is not flashing, the problem is solved. If the Print Cartridge Status light is flashing, go to the next step. 3. Manually clean the print cartridge. 4. Reinsert the print cartridge in the printer and close the printer cover. If the Print Cartridge Status light is still flashing, the print cartridge is faulty and must be replaced. User's guide 73
-
 1
1 -
2
-
3
-
4
-
5
-
6
-
7
-
8
-
9
-
10
-
11
-
12
-
13
-
14
-
15
-
16
-
17
-
18
-
19
-
20
-
21
-
22
-
23
-
24
-
25
-
26
-
27
-
28
-
29
-
30
-
31
-
32
-
33
-
34
-
35
-
36
-
37
-
38
-
39
-
40
-
41
-
42
-
43
-
44
-
45
-
46
-
47
-
48
-
49
-
50
-
51
-
52
-
53
-
54
-
55
-
56
-
57
-
58
-
59
-
60
-
61
-
62
-
63
-
64
-
65
-
66
-
67
-
68
-
69
-
 70
70 -
 71
71 -
 72
72 -
 73
73 -
 74
74 -
 75
75 -
 76
76 -
 77
77 -
 78
78 -
 79
79 -
 80
80 -
81
-
82
-
83
-
84
-
85
-
86
-
87
-
88
-
89
-
90
-
91
-
92
-
93
-
94
-
95
-
96
-
97
-
98
-
99
-
100
-
101
-
102
 |
 |
