HP 5940 User Guide - Page 92
If the status light is on and not flashing, Resume, If the status and Resume lights are flashing - deskjet photo printer manual
 |
View all HP 5940 manuals
Add to My Manuals
Save this manual to your list of manuals |
Page 92 highlights
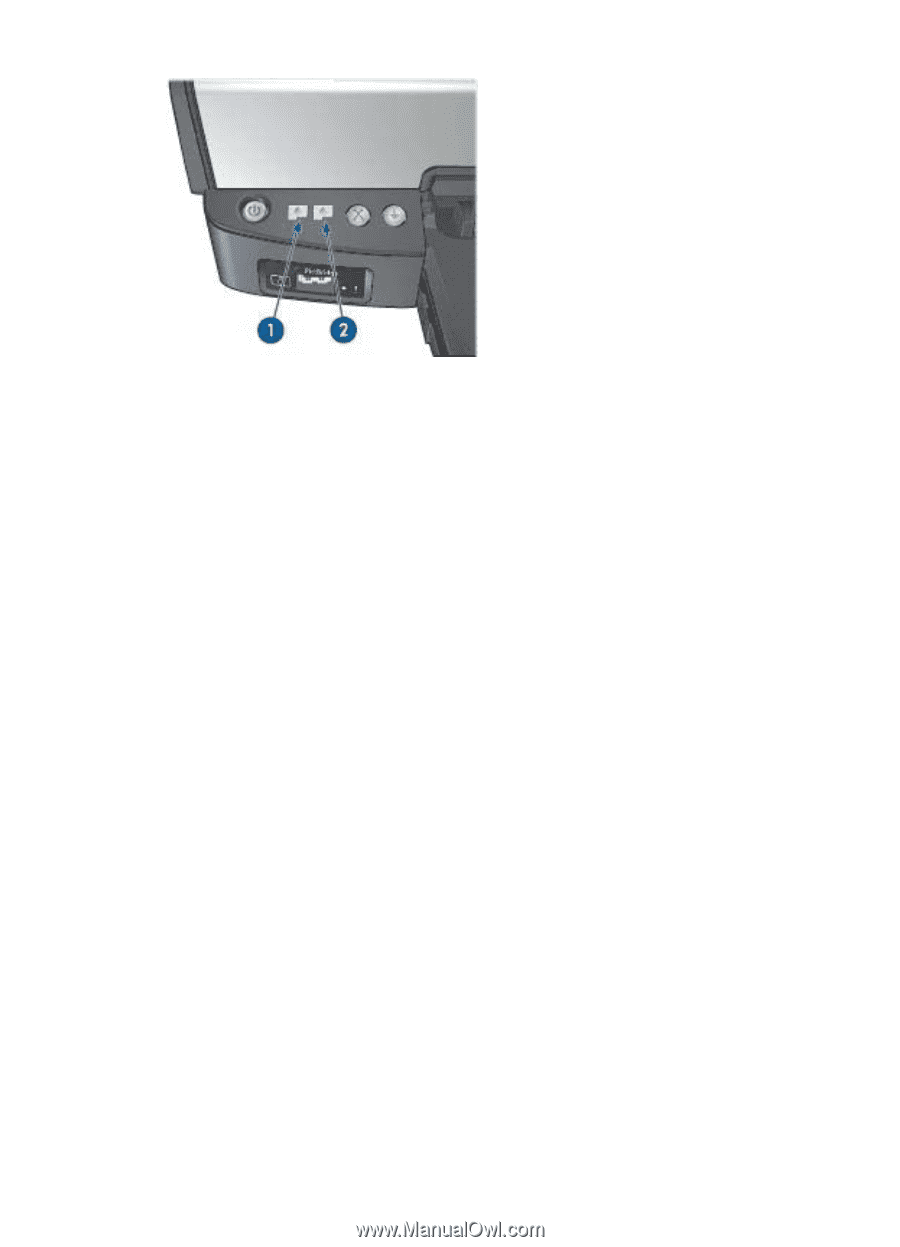
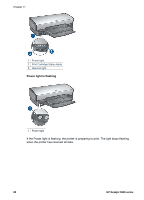
Chapter 11 1. The left status light represents the tri-color print cartridge, which is installed in the left side of the print cartridge cradle. 2. The right status light represents the black or the photo print cartridge. One of these print cartridges is installed in the right side of the print cartridge cradle. If the status light is on and not flashing ● Check to see if a print cartridge is low on ink. If a print cartridge is low on ink, consider replacing the print cartridge. ● If neither print cartridge is low on ink, press the Resume button. If the Print Cartridge Status light remains on, turn off, and then turn on the printer. If the status light is on and flashing Verify that the correct print cartridges are installed. If you were printing a borderless document when the light started flashing, follow the borderless printing guidelines. Otherwise, follow these steps: 1. Raise the printer cover, remove the print cartridge on the right, and then lower the cover. 2. Follow one of these steps: - If the light is flashing: Open the printer cover, replace the print cartridge that you removed, and then remove the other print cartridge. Proceed to step 3. - If the light is off: There is a problem with the print cartridge that you removed. Proceed to step 3. 3. Manually clean the print cartridge. After cleaning the print cartridge, reinsert it into the printer. If the light continues to flash, replace the print cartridge. If the status and Resume lights are flashing The paper size or type selected in the software program or in the printer software does not match the paper in the In tray. For information about resolving the mismatch, see Paper mismatch. 90 HP Deskjet 5900 series
-
 1
1 -
2
-
3
-
4
-
5
-
6
-
7
-
8
-
9
-
10
-
11
-
12
-
13
-
14
-
15
-
16
-
17
-
18
-
19
-
20
-
21
-
22
-
23
-
24
-
25
-
26
-
27
-
28
-
29
-
30
-
31
-
32
-
33
-
34
-
35
-
36
-
37
-
38
-
39
-
40
-
41
-
42
-
43
-
44
-
45
-
46
-
47
-
48
-
49
-
50
-
51
-
52
-
53
-
54
-
55
-
56
-
57
-
58
-
59
-
60
-
61
-
62
-
63
-
64
-
65
-
66
-
67
-
68
-
69
-
70
-
71
-
72
-
73
-
74
-
75
-
76
-
77
-
78
-
79
-
80
-
81
-
82
-
83
-
84
-
85
-
86
-
 87
87 -
 88
88 -
 89
89 -
 90
90 -
 91
91 -
 92
92 -
 93
93 -
 94
94 -
 95
95 -
 96
96 -
 97
97 -
98
-
99
-
100
-
101
-
102
 |
 |