HP 6100 EMULEX EZPilot EVA Version 2.0 User Manual (5697-6961, July 2007) - Page 11
EZPilot - Installation Obtain network settings automatically, Next Switch, Continue - windows 8
 |
View all HP 6100 manuals
Add to My Manuals
Save this manual to your list of manuals |
Page 11 highlights
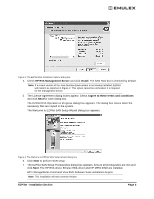
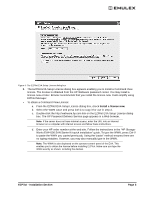
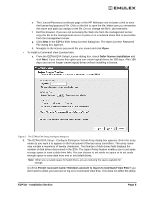
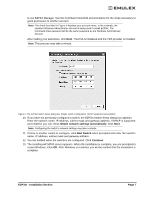
to use EZPilot Manager. See the Command View EVA documentation for the steps necessary to grant permission to another account. Note: The check box label in Figure 5 displays your account name. In the example, the standard Windows Administrator account is being used to install EZPilot. The Command View password will be the same password as the Windows Administrator account. After making your selections, click Next. The EVA is initialized and the VDS provider is installed. Note: This process may take a minute. Figure 6: The EZPilot Switch Setup dialog box (Single switch configuration. DHCP supported and enabled) 10. If you have not previously configured a switch, the EZPilot Switch Setup dialog box appears. Enter the switch's name, IP address, subnet mask and gateway address. If DHCP is supported and enabled, you can check Obtain network settings automatically. Click Next. Note: Configuring the switch's network settings may take a minute. 11. If there is another switch to configure, click Next Switch when prompted and enter the switch's name, IP address, subnet mask and gateway address. 12. You are notified when the switches are configured. Click Continue. 13. The Installing HP MPIO screen appears. When the installation is complete, you are prompted to restart Windows. Click OK. After Windows is restarted, you will be notified that the installation is complete. EZPilot - Installation Section Page 7
-
 1
1 -
2
-
3
-
4
-
5
-
 6
6 -
 7
7 -
 8
8 -
 9
9 -
 10
10 -
 11
11 -
 12
12 -
 13
13 -
 14
14 -
 15
15 -
 16
16 -
17
-
18
-
19
-
20
-
21
-
22
-
23
-
24
-
25
-
26
-
27
-
28
-
29
-
30
-
31
-
32
-
33
-
34
-
35
-
36
-
37
-
38
-
39
-
40
-
41
-
42
-
43
-
44
-
45
-
46
-
47
-
48
-
49
-
50
-
51
-
52
-
53
-
54
-
55
-
56
-
57
 |
 |
