HP Color LaserJet Enterprise M651 User Guide 1 - Page 47
Select the paper type (Mac OS X), Additional print tasks, Show Details, Layout, s per Sheet
 |
View all HP Color LaserJet Enterprise M651 manuals
Add to My Manuals
Save this manual to your list of manuals |
Page 47 highlights
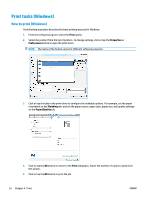
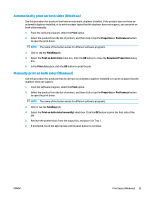
3. Open the menus drop-down list or click Show Details, and then click the Layout menu. 4. From the Pages per Sheet drop-down list, select the number of pages that you want to print on each sheet. 5. In the Layout Direction area, select the order and placement of the pages on the sheet. 6. From the Borders menu, select the type of border to print around each page on the sheet. 7. Click the Print button. Select the paper type (Mac OS X) 1. Click the File menu, and then click the Print option. 2. In the Printer menu, select the product. 3. Open the menus drop-down list or click Show Details, and then click the Finishing menu. 4. Select a type from the Media-type drop-down list. 5. Click the Print button. Additional print tasks In the US, go to www.hp.com/support/colorljM651. Outside the US, go to www.hp.com/support. Select your country/region. Click Troubleshooting. Enter the product name, and then select Search. Instructions are available for performing specific print tasks, such as the following: ● Create and use printing shortcuts or presets ● Select the paper size, or use a custom paper size ● Select the page orientation ● Create a booklet ● Scale a document to fit a specific paper size ● Print the first or last pages of the document on different paper ● Print watermarks on a document ENWW Print tasks (Mac OS X) 39
-
 1
1 -
2
-
3
-
4
-
5
-
6
-
7
-
8
-
9
-
10
-
11
-
12
-
13
-
14
-
15
-
16
-
17
-
18
-
19
-
20
-
21
-
22
-
23
-
24
-
25
-
26
-
27
-
28
-
29
-
30
-
31
-
32
-
33
-
34
-
35
-
36
-
37
-
38
-
39
-
40
-
41
-
 42
42 -
 43
43 -
 44
44 -
 45
45 -
 46
46 -
 47
47 -
 48
48 -
 49
49 -
 50
50 -
 51
51 -
 52
52 -
53
-
54
-
55
-
56
-
57
-
58
-
59
-
60
-
61
-
62
-
63
-
64
-
65
-
66
-
67
-
68
-
69
-
70
-
71
-
72
-
73
-
74
-
75
-
76
-
77
-
78
-
79
-
80
-
81
-
82
-
83
-
84
-
85
-
86
-
87
-
88
-
89
-
90
-
91
-
92
-
93
-
94
-
95
-
96
-
97
-
98
-
99
-
100
-
101
-
102
-
103
-
104
-
105
-
106
-
107
-
108
-
109
-
110
-
111
-
112
 |
 |