HP Designjet 9000s Service Manual - Page 179
Image is Completely Blank or Faded, Output Only Contains a Partial Print, The Printer Area is Stained
 |
View all HP Designjet 9000s manuals
Add to My Manuals
Save this manual to your list of manuals |
Page 179 highlights
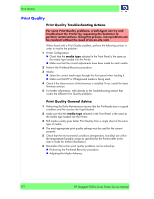
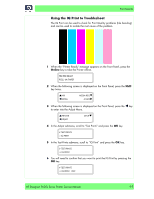
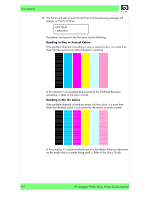
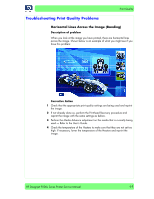
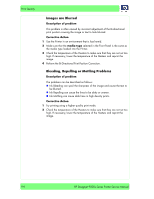
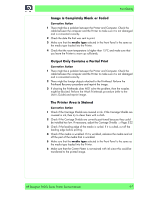
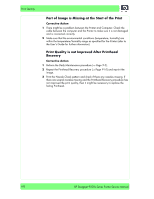
Print Quality Image is Completely Blank or Faded Corrective Action 1 There might be a problem between the Printer and Computer. Check the cable between the computer and the Printer to make sure it is not damaged and is connected correctly. 2 Check the date file that was sent to print. 3 Make sure that the media type selected in the Front Panel is the same as the media type loaded into the Printer. 4 Check that the room temperature is higher than 15oC and make sure that you leave the Printer to warm up sufficiently. Output Only Contains a Partial Print Corrective Action 1 There might be a problem between the Printer and Computer. Check the cable between the computer and the Printer to make sure it is not damaged and is connected correctly. 2 There might be foreign objects attached to the Printhead. Perform the Printhead Recovery procedure and reprint the image. 3 If cleaning the Printheads does NOT solve the problem, then the nozzles might be blocked. Perform the Wash Printheads procedure (refer to the User's Guide) and reprint image. The Printer Area is Stained Corrective Action 1 Check if the Carriage Shields are covered in ink. If the Carriage Shields are covered in ink, then try to clean them with a cloth. 2 Check if the Carriage Shields are correctly positioned because they could be installed too low. If necessary, adjust the Carriage Shields ⇒ Page 5-22. 3 Check if the leading edge of the media is curled. If it is curled, cut off the leading edge before printing. 4 Check if the media is wrinkled. If it is wrinkled, advance the media and cut off the part of the media that is wrinkled. 5 Make sure that the media type selected in the Front Panel is the same as the media type loaded into the Printer. 6 Make sure that the Center Platen is not stained with ink since this could be transferred to the printed image. HP Designjet 9000s Series Printer Service Manual 6-7
-
 1
1 -
2
-
3
-
4
-
5
-
6
-
7
-
8
-
9
-
10
-
11
-
12
-
13
-
14
-
15
-
16
-
17
-
18
-
19
-
20
-
21
-
22
-
23
-
24
-
25
-
26
-
27
-
28
-
29
-
30
-
31
-
32
-
33
-
34
-
35
-
36
-
37
-
38
-
39
-
40
-
41
-
42
-
43
-
44
-
45
-
46
-
47
-
48
-
49
-
50
-
51
-
52
-
53
-
54
-
55
-
56
-
57
-
58
-
59
-
60
-
61
-
62
-
63
-
64
-
65
-
66
-
67
-
68
-
69
-
70
-
71
-
72
-
73
-
74
-
75
-
76
-
77
-
78
-
79
-
80
-
81
-
82
-
83
-
84
-
85
-
86
-
87
-
88
-
89
-
90
-
91
-
92
-
93
-
94
-
95
-
96
-
97
-
98
-
99
-
100
-
101
-
102
-
103
-
104
-
105
-
106
-
107
-
108
-
109
-
110
-
111
-
112
-
113
-
114
-
115
-
116
-
117
-
118
-
119
-
120
-
121
-
122
-
123
-
124
-
125
-
126
-
127
-
128
-
129
-
130
-
131
-
132
-
133
-
134
-
135
-
136
-
137
-
138
-
139
-
140
-
141
-
142
-
143
-
144
-
145
-
146
-
147
-
148
-
149
-
150
-
151
-
152
-
153
-
154
-
155
-
156
-
157
-
158
-
159
-
160
-
161
-
162
-
163
-
164
-
165
-
166
-
167
-
168
-
169
-
170
-
171
-
172
-
173
-
 174
174 -
 175
175 -
 176
176 -
 177
177 -
 178
178 -
 179
179 -
 180
180 -
 181
181 -
 182
182 -
 183
183 -
 184
184 -
185
-
186
-
187
-
188
-
189
-
190
-
191
-
192
-
193
-
194
-
195
-
196
-
197
-
198
-
199
-
200
-
201
-
202
-
203
-
204
-
205
-
206
-
207
-
208
-
209
-
210
-
211
-
212
-
213
-
214
-
215
-
216
-
217
-
218
-
219
-
220
-
221
-
222
-
223
-
224
-
225
-
226
-
227
-
228
-
229
-
230
-
231
-
232
-
233
-
234
-
235
-
236
-
237
-
238
-
239
-
240
-
241
-
242
-
243
-
244
-
245
-
246
-
247
-
248
-
249
-
250
-
251
-
252
-
253
-
254
-
255
-
256
-
257
-
258
-
259
-
260
-
261
-
262
-
263
-
264
-
265
-
266
-
267
-
268
-
269
-
270
-
271
-
272
-
273
-
274
-
275
-
276
-
277
-
278
-
279
-
280
-
281
-
282
-
283
-
284
-
285
-
286
-
287
-
288
-
289
-
290
-
291
-
292
-
293
-
294
-
295
-
296
-
297
-
298
-
299
-
300
-
301
-
302
-
303
-
304
-
305
-
306
-
307
-
308
-
309
-
310
-
311
-
312
-
313
-
314
-
315
-
316
-
317
-
318
-
319
-
320
-
321
-
322
-
323
-
324
-
325
-
326
-
327
-
328
-
329
-
330
-
331
-
332
-
333
-
334
-
335
-
336
-
337
-
338
-
339
-
340
-
341
-
342
-
343
-
344
-
345
-
346
-
347
-
348
-
349
-
350
-
351
-
352
-
353
-
354
-
355
-
356
-
357
-
358
-
359
-
360
-
361
-
362
-
363
-
364
-
365
-
366
-
367
-
368
-
369
-
370
-
371
-
372
 |
 |