HP DeskJet 2600 User Guide - Page 93
Read general instructions in the Help for resolving print quality issues, Power, Media
 |
View all HP DeskJet 2600 manuals
Add to My Manuals
Save this manual to your list of manuals |
Page 93 highlights
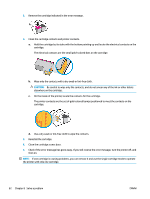
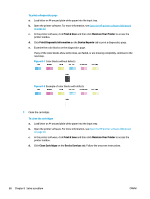
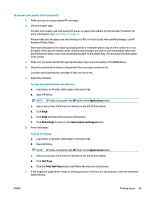
Read general instructions in the Help for resolving print quality issues NOTE: To protect the cartridges from drying out, always turn the printer off using the Power button, and wait until the Power button light goes out. To improve print quality (Windows) 1. Make sure you are using original HP cartridges. 2. Check the paper type. For best print quality, use high quality HP paper, or papers that adhere to the ColorLok® standard. For more information, see Paper basics on page 17. Always make sure the paper you are printing on is flat. For best results when printing images, use HP Advanced Photo Paper. Store specialty paper in its original packaging inside a resealable plastic bag on a flat surface in a cool, dry place. When you are ready to print, remove only the paper you plan to use immediately. When you have finished printing, return any unused photo paper to the plastic bag. This prevents the photo paper from curling. 3. Check the printer software to make sure you have selected the appropriate paper type from the Media drop-down list and print quality from the Quality Settings drop-down list. In the printer software, click Print & Scan , and then click Set Preferences to access the print properties. 4. Check the estimated ink levels to determine if the cartridges are low on ink. For more information, see Check estimated ink levels on page 54. If the cartridges are low on ink consider replacing them. 5. Align the cartridges. To align the cartridges a. Load letter or A4 unused plain white paper into the input tray. b. Open the printer software. For more information, see Open the HP printer software (Windows) on page 20. c. In the printer software, click Print & Scan and then click Maintain Your Printer to access the printer toolbox. The printer toolbox appears. d. Click Align Cartridges on the Device Services tab. The printer prints an alignment page. e. Follow the onscreen instructions to align the cartridges. Recycle or discard the cartridge alignment sheet later. 6. Print a diagnostics page if the cartridges are not low on ink. ENWW Printing issues 87
-
 1
1 -
2
-
3
-
4
-
5
-
6
-
7
-
8
-
9
-
10
-
11
-
12
-
13
-
14
-
15
-
16
-
17
-
18
-
19
-
20
-
21
-
22
-
23
-
24
-
25
-
26
-
27
-
28
-
29
-
30
-
31
-
32
-
33
-
34
-
35
-
36
-
37
-
38
-
39
-
40
-
41
-
42
-
43
-
44
-
45
-
46
-
47
-
48
-
49
-
50
-
51
-
52
-
53
-
54
-
55
-
56
-
57
-
58
-
59
-
60
-
61
-
62
-
63
-
64
-
65
-
66
-
67
-
68
-
69
-
70
-
71
-
72
-
73
-
74
-
75
-
76
-
77
-
78
-
79
-
80
-
81
-
82
-
83
-
84
-
85
-
86
-
87
-
 88
88 -
 89
89 -
 90
90 -
 91
91 -
 92
92 -
 93
93 -
 94
94 -
 95
95 -
 96
96 -
 97
97 -
 98
98 -
99
-
100
-
101
-
102
-
103
-
104
-
105
-
106
-
107
-
108
-
109
-
110
-
111
-
112
-
113
-
114
-
115
-
116
-
117
-
118
-
119
-
120
-
121
-
122
-
123
-
124
-
125
-
126
-
127
-
128
 |
 |