HP Deskjet 1000c HP DeskJet 1000C Professional Series Printer - (English) User - Page 7
STEP 4: Installing the Print Cartridges, STEP 4 - ink
 |
View all HP Deskjet 1000c manuals
Add to My Manuals
Save this manual to your list of manuals |
Page 7 highlights
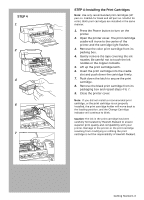
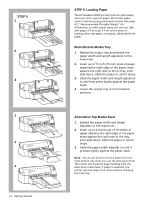
STEP 4 1 H PROFESSIONAL SERIES 2 4 6 7 STEP 4: Installing the Print Cartridges Note: Use only recommended print cartridges (HP part no. 51645A for black and HP part no. 51641A for color). Both print cartridges are installed in the same manner. 1. Press the Power button to turn on the printer. 2. Open the printer cover. The print cartridge cradle will move to the center of the printer and the cartridge light flashes. 3. Remove the color print cartridge from its packing box. 4. Gently remove the tape covering the ink nozzles. Be careful not to touch the ink nozzles or the copper contacts. 5. Lift up the print cartridge latch. 6. Insert the print cartridge into the cradle slot and push down the cartridge firmly. 7. Push down the latch to secure the print cartridge. 8. Remove the black print cartridge from its packaging box and repeat steps 4 to 7. 9. Close the printer cover. Note: If you did not install a recommended print cartridge, or the print cartridge is not properly installed, the print cartridge holder will move back to the loading position, and the Change Cartridge indicator will continue to blink. Caution: The ink in the print cartridge has been carefully formulated by Hewlett-Packard to ensure superior print quality and compatibility with your printer. Damage to the printer or the print cartridge resulting from modifying or refilling the print cartridge is not the responsibility of Hewlett-Packard. Getting Started 1-3
-
 1
1 -
 2
2 -
 3
3 -
 4
4 -
 5
5 -
 6
6 -
 7
7 -
 8
8 -
 9
9 -
 10
10 -
 11
11 -
 12
12 -
13
-
14
-
15
-
16
-
17
-
18
-
19
-
20
-
21
-
22
-
23
-
24
-
25
-
26
-
27
-
28
-
29
-
30
-
31
-
32
-
33
-
34
-
35
-
36
-
37
-
38
-
39
-
40
 |
 |
