HP Deskjet F4500 User Guide - Page 55
Check printer settings
 |
View all HP Deskjet F4500 manuals
Add to My Manuals
Save this manual to your list of manuals |
Page 55 highlights
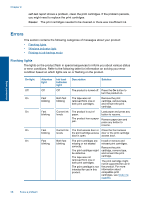
Solve a problem Check printer settings Try the following solutions. • Solution 1: Check the print settings • Solution 2: Verify the paper size setting • Solution 3: Check the printer margins Solution 1: Check the print settings Solution: Check the print settings. • Check the print settings to see if the color settings are incorrect. For example, check to see if the document is set to print in grayscale. Or, check to see if advanced color settings such as saturation, brightness, or color tone, are set to modify the appearance of colors. • Check the print quality setting and make sure it matches the type of paper loaded in the product. You might need to choose a lower print quality setting, if colors are running into each other. Or, choose a higher setting if you are printing a high-quality photo, and then make sure photo paper such as HP Advanced Photo Paper, is loaded in the paper tray. NOTE: On some computer screens, colors might appear differently than they do when printed on paper. In this case, there is nothing wrong with the product, print settings, or ink cartridges. No further troubleshooting is required. Cause: The print settings were set incorrectly. If this did not solve the issue, try the next solution. Solution 2: Verify the paper size setting Solution: Verify that you have selected the proper paper size setting for your project. Make sure that you have loaded the correct paper size in the paper tray. Cause: The paper size setting might not have been set correctly for the project you were printing. If this did not solve the issue, try the next solution. Solution 3: Check the printer margins Solution: Check the printer margins. Print troubleshooting 53
-
 1
1 -
2
-
3
-
4
-
5
-
6
-
7
-
8
-
9
-
10
-
11
-
12
-
13
-
14
-
15
-
16
-
17
-
18
-
19
-
20
-
21
-
22
-
23
-
24
-
25
-
26
-
27
-
28
-
29
-
30
-
31
-
32
-
33
-
34
-
35
-
36
-
37
-
38
-
39
-
40
-
41
-
42
-
43
-
44
-
45
-
46
-
47
-
48
-
49
-
 50
50 -
 51
51 -
 52
52 -
 53
53 -
 54
54 -
 55
55 -
 56
56 -
 57
57 -
 58
58 -
 59
59 -
 60
60 -
61
-
62
-
63
-
64
-
65
-
66
-
67
-
68
-
69
-
70
-
71
-
72
-
73
-
74
-
75
-
76
-
77
-
78
-
79
-
80
 |
 |