HP Deskjet F4500 User Guide - Page 56
Scan troubleshooting, To check your margin settings, Print Preview, Cause, Solution - scanning software
 |
View all HP Deskjet F4500 manuals
Add to My Manuals
Save this manual to your list of manuals |
Page 56 highlights
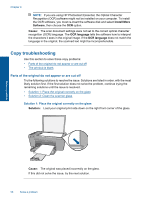
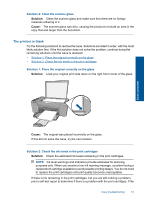
Solve a problem Chapter 9 Make sure the margin settings for the document do not exceed the printable area of the product. To check your margin settings 1. Preview your print job before sending it to the product. In most software applications, click the File menu, and then click Print Preview. 2. Check the margins. The product uses the margins you have set in your software application, as long as they are greater than the minimum margins the product supports. For more information about setting margins in your software application, see the documentation that came with the software. 3. Cancel the print job if the margins are not satisfactory, and then adjust the margins in your software application. Cause: The margins were not set correctly in your software application. If this did not solve the issue, try the next solution. Reset the product Solution: Turn off the product, and then unplug the power cord. Plug the power cord back in, and then press the On button to turn on the product. Cause: The product experienced an error. If this did not solve the issue, try the next solution. Scan troubleshooting Use this section to solve these scan problems: • Scanned image is incorrectly cropped • Scanned image shows dotted lines instead of text • Text format is incorrect • Text is incorrect or missing Scanned image is incorrectly cropped Solution: The autocropping feature in the HP Solution Center software crops anything that is not part of the main image. Sometimes this might not be what you want. In that case, turn off autocropping in the HP Solution Center software and crop the scanned image manually, or not at all. Cause: The software was set to automatically crop scanned pictures. Scanned image shows dotted lines instead of text Solution: Make a black-and-white copy of the original and then scan the copy. 54 Solve a problem
-
 1
1 -
2
-
3
-
4
-
5
-
6
-
7
-
8
-
9
-
10
-
11
-
12
-
13
-
14
-
15
-
16
-
17
-
18
-
19
-
20
-
21
-
22
-
23
-
24
-
25
-
26
-
27
-
28
-
29
-
30
-
31
-
32
-
33
-
34
-
35
-
36
-
37
-
38
-
39
-
40
-
41
-
42
-
43
-
44
-
45
-
46
-
47
-
48
-
49
-
50
-
 51
51 -
 52
52 -
 53
53 -
 54
54 -
 55
55 -
 56
56 -
 57
57 -
 58
58 -
 59
59 -
 60
60 -
 61
61 -
62
-
63
-
64
-
65
-
66
-
67
-
68
-
69
-
70
-
71
-
72
-
73
-
74
-
75
-
76
-
77
-
78
-
79
-
80
 |
 |