HP Elite 7100 Hardware Reference Guide - HP Elite 7100 Series Microtower PCs - Page 15
Installing a DIMM, Installing Additional Memory
 |
View all HP Elite 7100 manuals
Add to My Manuals
Save this manual to your list of manuals |
Page 15 highlights
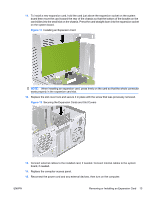
7. Open both latches of the memory module socket (1), and insert the memory module into the socket (2). NOTE: Populate the DIMM slots in the following order: DIMM2 (blue) , DIMM4 (blue), DIMM1 (black), then DIMM3 (black). Install larger size modules first, then smaller size modules (for example, 2GB first, then 1GB or 512MB). Figure 6 Installing a DIMM NOTE: A memory module can be installed in only one way. Match the notch on the module with the tab on the memory socket. 8. Push the DIMM module down firmly into the socket, ensuring that the module is fully inserted and properly seated. The DIMM must be pushed all the way down into the socket and sit evenly in the socket to avoid memory corruption. Make sure the latches are in the closed position (3). 9. Repeat steps 7 and 8 to install any additional modules. 10. Replace the computer access panel. 11. Reconnect the power cord and any external devices, then turn on the computer. The computer should automatically recognize the additional memory when you turn on the computer. 12. Lock any security devices that were disengaged when the access panel was removed. ENWW Installing Additional Memory 9
-
 1
1 -
2
-
3
-
4
-
5
-
6
-
7
-
8
-
9
-
 10
10 -
 11
11 -
 12
12 -
 13
13 -
 14
14 -
 15
15 -
 16
16 -
 17
17 -
 18
18 -
 19
19 -
 20
20 -
21
-
22
-
23
-
24
-
25
-
26
-
27
-
28
-
29
-
30
-
31
-
32
-
33
-
34
-
35
-
36
-
37
-
38
-
39
-
40
-
41
-
42
-
43
-
44
 |
 |
