HP Elite 7100 Hardware Reference Guide - HP Elite 7100 Series Microtower PCs - Page 23
CAUTION, Disconnecting the Power and Data Cables
 |
View all HP Elite 7100 manuals
Add to My Manuals
Save this manual to your list of manuals |
Page 23 highlights
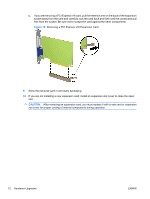
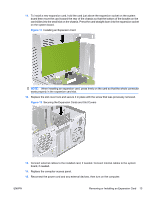
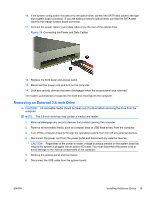
6. Disconnect the power cable (1) and data cable (2) from the rear of the optical drive. CAUTION: On some models you must press down on the latch on top of the power and data cables when disconnecting the cables from the drive. Failure to press down on the latch can damage the cable connectors. Figure 15 Disconnecting the Power and Data Cables 7. Remove the two screws that secure the drive to the drive cage (1), then slide the drive out of the front of the chassis (2). Figure 16 Removing the Optical Drive ENWW Installing Additional Drives 17
-
 1
1 -
2
-
3
-
4
-
5
-
6
-
7
-
8
-
9
-
10
-
11
-
12
-
13
-
14
-
15
-
16
-
17
-
 18
18 -
 19
19 -
 20
20 -
 21
21 -
 22
22 -
 23
23 -
 24
24 -
 25
25 -
 26
26 -
 27
27 -
 28
28 -
29
-
30
-
31
-
32
-
33
-
34
-
35
-
36
-
37
-
38
-
39
-
40
-
41
-
42
-
43
-
44
 |
 |

6.
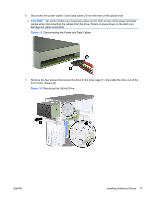
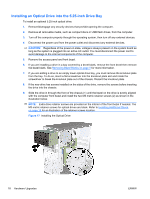
Disconnect the power cable (1) and data cable (2) from the rear of the optical drive.
CAUTION:
On some models you must press down on the latch on top of the power and data
cables when disconnecting the cables from the drive. Failure to press down on the latch can
damage the cable connectors.
Figure 15
Disconnecting the Power and Data Cables
7.
Remove the two screws that secure the drive to the drive cage (1), then slide the drive out of the
front of the chassis (2).
Figure 16
Removing the Optical Drive
ENWW
Installing Additional Drives
17