HP Elite 7100 Maintenance & Service Guide: HP Elite 7100 Series Microtower - Page 15
Computer Setup—Main - specification
 |
View all HP Elite 7100 manuals
Add to My Manuals
Save this manual to your list of manuals |
Page 15 highlights
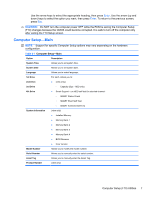
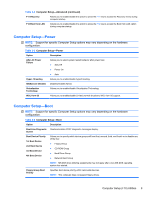
Use the arrow keys to select the appropriate heading, then press Enter. Use the arrow (up and down) keys to select the option you want, then press Enter. To return to the previous screen, press Esc. CAUTION: Do NOT turn the computer power OFF while the ROM is saving the Computer Setup (F10) changes because the CMOS could become corrupted. It is safe to turn off the computer only after exiting the F10 Setup screen. Computer Setup-Main NOTE: Support for specific Computer Setup options may vary depending on the hardware configuration. Table 3-1 Computer Setup-Main Option Description System Time Allows you to set system time. System Date Allows you to set system date. Language Allows you to select language. 1st Drive For each, allows you to: 2nd Drive ● (view only) 3rd Drive ◦ Capacity (Size - HDD only) 4th Drive ● Smart Support - run HDD self-test for selected channel: ◦ SMART Status Check ◦ SMART Short Self-Test ◦ SMART Extended Self-Test System Information (view only) ● Installed Memory ● Memory Bank 1 ● Memory Bank 2 ● Memory Bank 3 ● Memory Bank 4 ● BIOS Revision ● Core Version Model Number Allows you to modify the model number. Serial Number Allows you to manually enter the serial number. Asset Tag Allows you to manually enter the Asset Tag. Product Number (view only) Computer Setup (F10) Utilities 7
-
 1
1 -
2
-
3
-
4
-
5
-
6
-
7
-
8
-
9
-
 10
10 -
 11
11 -
 12
12 -
 13
13 -
 14
14 -
 15
15 -
 16
16 -
 17
17 -
 18
18 -
 19
19 -
 20
20 -
21
-
22
-
23
-
24
-
25
-
26
-
27
-
28
-
29
-
30
-
31
-
32
-
33
-
34
-
35
-
36
-
37
-
38
-
39
-
40
-
41
-
42
-
43
-
44
-
45
-
46
-
47
-
48
-
49
-
50
-
51
-
52
-
53
-
54
-
55
-
56
-
57
-
58
-
59
-
60
-
61
-
62
-
63
-
64
-
65
-
66
-
67
-
68
-
69
-
70
-
71
-
72
-
73
-
74
-
75
-
76
-
77
-
78
-
79
-
80
-
81
-
82
-
83
-
84
-
85
-
86
-
87
-
88
-
89
-
90
-
91
-
92
-
93
-
94
-
95
-
96
-
97
-
98
-
99
-
100
-
101
-
102
-
103
-
104
-
105
-
106
-
107
-
108
-
109
-
110
-
111
-
112
-
113
-
114
-
115
-
116
-
117
-
118
-
119
-
120
-
121
-
122
-
123
-
124
-
125
-
126
-
127
 |
 |