HP Evo D500 Hardware Reference Guide Compaq Evo Desktop Family Convertible Min - Page 13
proper orientation for the desktop configuration.
 |
View all HP Evo D500 manuals
Add to My Manuals
Save this manual to your list of manuals |
Page 13 highlights
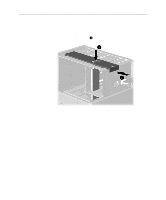
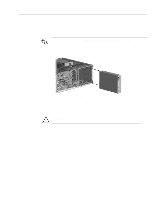
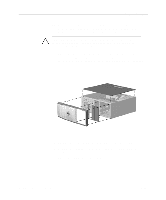
Product Features Installing a Drive in the Desktop Configuration 8. Gently slide the drive into the bay. When the drive is properly inserted, the drivelock will secure it. CAUTION: The use of unnecessary force may result in damage to the drives. 9. Reconnect all power and data cables to the drives in the 5.25inch drive bays. 10. Remove the subpanel as described in the section "Removing Bezel Blanks" and reposition it with the bezel blanks in the proper orientation for the desktop configuration. 11. Remove the chrome logo plate from the subpanel and reposition it (rotate it 180°) with the logo plate in the proper orientation for the desktop configuration, then snap it back into the subpanel. Hardware Reference Guide 1-9
-
 1
1 -
2
-
3
-
4
-
5
-
6
-
7
-
 8
8 -
 9
9 -
 10
10 -
 11
11 -
 12
12 -
 13
13 -
 14
14 -
 15
15 -
 16
16 -
 17
17 -
 18
18 -
19
-
20
-
21
-
22
-
23
-
24
-
25
-
26
-
27
-
28
-
29
-
30
-
31
-
32
-
33
-
34
-
35
-
36
-
37
-
38
-
39
-
40
-
41
-
42
-
43
-
44
-
45
-
46
-
47
-
48
-
49
-
50
-
51
-
52
-
53
-
54
-
55
-
56
-
57
-
58
-
59
-
60
-
61
-
62
-
63
-
64
-
65
-
66
-
67
-
68
 |
 |

Product Features
Installing a Drive in the Desktop Configuration
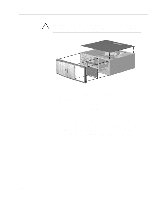
8.
Gently slide the drive into the bay. When the drive is properly
inserted, the drivelock will secure it.
CAUTION:
The use of unnecessary force may result in damage to the
drives.
9.
Reconnect all power and data cables to the drives in the 5.25-
inch drive bays.
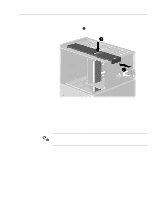
10. Remove the subpanel as described in the section “Removing
Bezel Blanks” and reposition it with the bezel blanks in the
proper orientation for the desktop configuration.
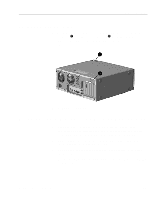
11. Remove the chrome logo plate from the subpanel and reposition
it (rotate it 180°) with the logo plate in the proper orientation for
the desktop configuration, then snap it back into the subpanel.
Hardware Reference Guide
1-9