HP G42-232NR Notebook PC User Guide - Windows 7 - Page 74
Using Battery Check, Inserting or removing the battery, Start, Help and Support, Troubleshoot, Power
 |
View all HP G42-232NR manuals
Add to My Manuals
Save this manual to your list of manuals |
Page 74 highlights
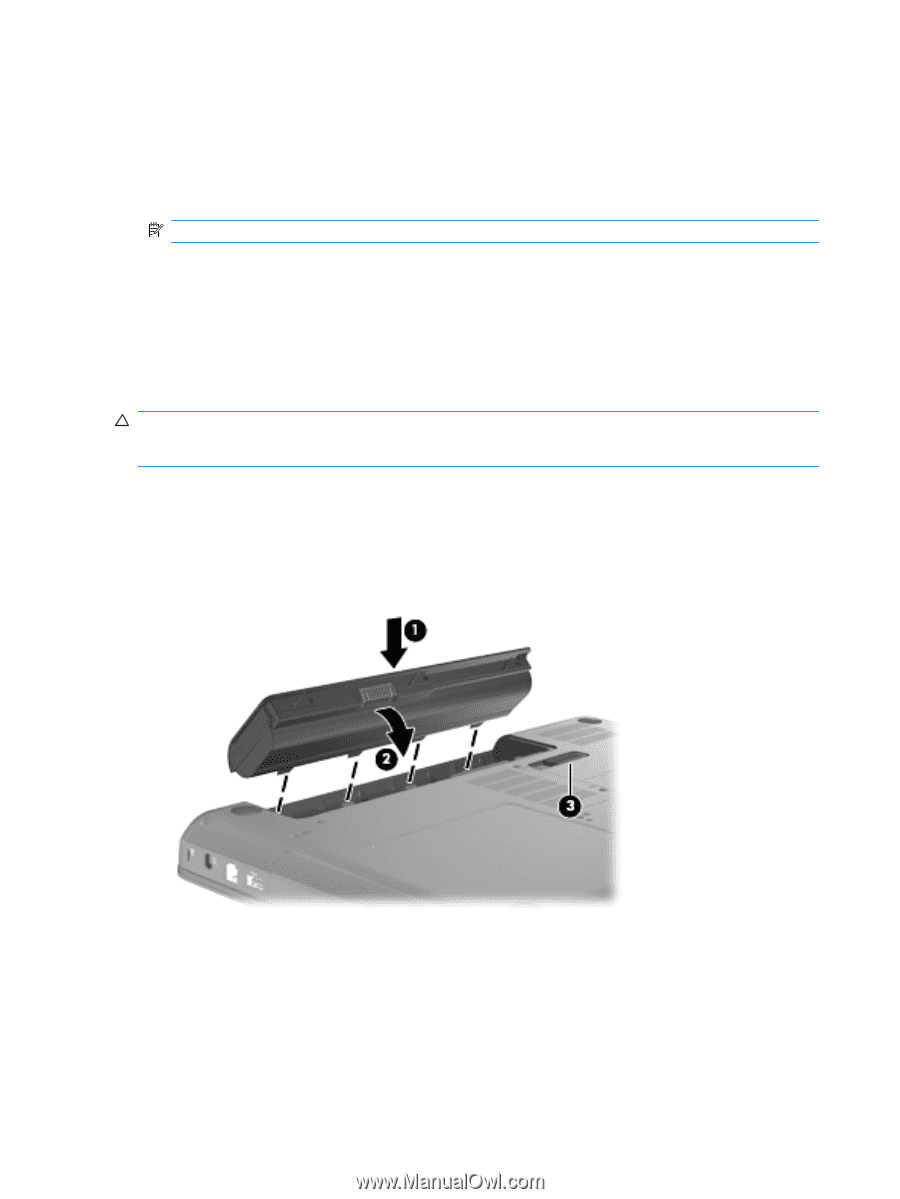
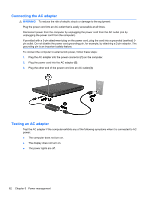
Using Battery Check Help and Support provides information on the status of the battery installed in the computer. To run Battery Check: 1. Connect the AC adapter to the computer. NOTE: The computer must be connected to external power for Battery Check to function properly. 2. Select Start > Help and Support > Troubleshoot > Power, Thermal and Mechanical. 3. Click the Power tab, and then click Battery Check. Battery Check examines the battery and its cells to see if they are functioning properly, and then reports the results of the examination. Inserting or removing the battery CAUTION: Removing a battery that is the sole power source may cause loss of information. To prevent loss of information, save your work and initiate Hibernation or shut down the computer through Windows before removing the battery. To insert the battery: 1. Turn the computer upside down on a flat surface. 2. Align the tabs on the battery with the notches on the computer, insert the battery (1), and then pivot the battery downward (2) into the battery bay. The battery release latch (3) automatically locks the battery into place. To remove the battery: 1. Turn the computer upside down on a flat surface. 2. Slide the battery release latch (1) to release the battery. 3. Pivot the battery (2) upward and remove it from the computer (3). 64 Chapter 5 Power management
-
 1
1 -
2
-
3
-
4
-
5
-
6
-
7
-
8
-
9
-
10
-
11
-
12
-
13
-
14
-
15
-
16
-
17
-
18
-
19
-
20
-
21
-
22
-
23
-
24
-
25
-
26
-
27
-
28
-
29
-
30
-
31
-
32
-
33
-
34
-
35
-
36
-
37
-
38
-
39
-
40
-
41
-
42
-
43
-
44
-
45
-
46
-
47
-
48
-
49
-
50
-
51
-
52
-
53
-
54
-
55
-
56
-
57
-
58
-
59
-
60
-
61
-
62
-
63
-
64
-
65
-
66
-
67
-
68
-
 69
69 -
 70
70 -
 71
71 -
 72
72 -
 73
73 -
 74
74 -
 75
75 -
 76
76 -
 77
77 -
 78
78 -
 79
79 -
80
-
81
-
82
-
83
-
84
-
85
-
86
-
87
-
88
-
89
-
90
-
91
-
92
-
93
-
94
-
95
-
96
-
97
-
98
-
99
-
100
-
101
-
102
-
103
-
104
-
105
-
106
-
107
-
108
-
109
-
110
-
111
-
112
-
113
-
114
-
115
-
116
-
117
-
118
-
119
 |
 |