HP Indigo WS6000 Writing Head Service Instructions -- CA393-00150Document P/N:
HP Indigo WS6000 Manual
 |
View all HP Indigo WS6000 manuals
Add to My Manuals
Save this manual to your list of manuals |
HP Indigo WS6000 manual content summary:
- HP Indigo WS6000 | Writing Head Service Instructions -- CA393-00150Document P/N: - Page 1
Head Service Instructions Installation instruction details Purpose Scope Document number Revision number Date Security level This guide describes the installation and configuration of the writing head during initial press installation and as a spare part. HP Indigo 7000 Digital Press, HP Indigo - HP Indigo WS6000 | Writing Head Service Instructions -- CA393-00150Document P/N: - Page 2
to use Troubleshooting ...1 2 Procedures ...2 Visual inspection...2 Mounting the writing head and connecting the cables...2 Initial focus and leveling adjustment ...5 Loading the writing head parameters...6 WHEL name change - for new writing head installation on HP Indigo w7200 Digital Press only - HP Indigo WS6000 | Writing Head Service Instructions -- CA393-00150Document P/N: - Page 3
Confidentiality notice...27 iii - HP Indigo WS6000 | Writing Head Service Instructions -- CA393-00150Document P/N: - Page 4
Interface screen as follows: 1. Click Main Menu > Problem Handling > HP Indigo Print Care > Component Service > Writing Head > Installation of Writing Head with Manual Interface. 2. Click Go to Process. When to use Troubleshooting Use the troubleshooting topics in the following cases: ● When the - HP Indigo WS6000 | Writing Head Service Instructions -- CA393-00150Document P/N: - Page 5
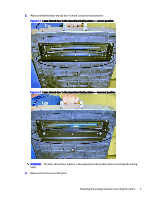
movement Mounting the writing head and connecting the cables Follow the steps below for mounting the writing head and connecting the cables 1. Switch the press and computer off. 2. Verify that the serial number on the parameter diskette or CD matches the serial number on the writing head. 2 Chapter - HP Indigo WS6000 | Writing Head Service Instructions -- CA393-00150Document P/N: - Page 6
- incorrect position WARNING! The laser shroud door must be in the closed (vertical) position before mounting the writing head. 4. Remove the roof cover of the press. Mounting the writing head and connecting the cables 3 - HP Indigo WS6000 | Writing Head Service Instructions -- CA393-00150Document P/N: - Page 7
mechanism 3 Leveling mechanism 4 Front focus mechanism NOTE: Make sure that the rear interface cable is not caught between the laser shroud and the press. 6. Close the laser shroud door. 7. Check that the rubber washer in the writing head interface is in good condition. 8. Make sure that the - HP Indigo WS6000 | Writing Head Service Instructions -- CA393-00150Document P/N: - Page 8
J1 Ethernet J2 CML J3 MCN J4 USB J5 RS232 & Test (not used) J6 Power NOTE: For the HP Indigo W7200 Digital Press, engine 2: When connecting J2, use the CML cable that comes from the press computer, not the cable that comes from engine 2. When connecting J5, use a CA361-6400 plug. When replacing - HP Indigo WS6000 | Writing Head Service Instructions -- CA393-00150Document P/N: - Page 9
adjustment knobs "up" according to the Focus Adjustment label on the press. An example of adjusting the knobs: To adjust the rear focus to the top of the writing head. NOTE: Skip this step during an initial press installation. Only verify that the parameters have been loaded correctly. NOTE: Make - HP Indigo WS6000 | Writing Head Service Instructions -- CA393-00150Document P/N: - Page 10
Placement NOTE: If necessary see troubleshooting: Loading the writing head parameters on page 14. WHEL name change - for new writing head installation on HP Indigo w7200 Digital Press only Refer below for new writing head installation on HP Indigo w7200 Digital Press only. 1. Disconnect the MCN1 - HP Indigo WS6000 | Writing Head Service Instructions -- CA393-00150Document P/N: - Page 11
Main Menu > Problem Handling > HP Indigo Print Care > Component Service > Writing Head > Installation of Writing Head with Manual Interface. 2. Click Go to Process > Run Image Placement Wizard. 3. Click Run Wizard. Follow the wizard instructions. NOTE: If necessary see troubleshooting: Initial image - HP Indigo WS6000 | Writing Head Service Instructions -- CA393-00150Document P/N: - Page 12
and Paper handling skew calibration job (for the HP Indigo 7000 Digital Press) NOTE: For the HP Indigo WS6000 Digital Press use the Transparency jig (CA098-00060). NOTE: If necessary see troubleshooting: Skew adjustment (only for the 7000 and W7200 Presses) on page 14. Color adjust Follow the steps - HP Indigo WS6000 | Writing Head Service Instructions -- CA393-00150Document P/N: - Page 13
. 4. Click Run Wizard. Follow the wizard instructions. NOTE: If necessary see troubleshooting: Color adjust on page 15. Verify focus fine Click Main Menu > Problem Handling > HP Indigo Print Care > Component Service > Writing Head > Installation of Writing Head with Manual Interface. 2. Click Go - HP Indigo WS6000 | Writing Head Service Instructions -- CA393-00150Document P/N: - Page 14
3. Click Run Wizard. Follow the wizard instructions. NOTE: If necessary see troubleshooting: Verify focus fine tuning on page 16. Verify and adjust the writing head tilt (Beam spacing) - manual Print the WritingHeadFocus.jlt job and verify the tilt adjustment. If the line spacing in the horizontal - HP Indigo WS6000 | Writing Head Service Instructions -- CA393-00150Document P/N: - Page 15
Main Menu > Problem Handling > HP Indigo Print Care > Component Service > Writing Head > Installation of Writing Head with Manual Interface. 2. Click Go to Process > Verify Scaling. 3. Click Run Wizard. Follow the wizard instructions. NOTE: If necessary see troubleshooting: Verifying scaling (only - HP Indigo WS6000 | Writing Head Service Instructions -- CA393-00150Document P/N: - Page 16
Wizard. Follow the wizard instructions. NOTE: If necessary see troubleshooting: Linear deskew correction on page 18. Writing head quality wizard Follow the steps below to check for Writing head quality. 1. Click Main Menu > Problem Handling > HP Indigo Print Care > Component Service > Writing Head - HP Indigo WS6000 | Writing Head Service Instructions -- CA393-00150Document P/N: - Page 17
perform the following procedure: 1. Click Main Menu > Problem Handling > CE Wizards. 2. Select Image Placement Calibration. 3. Click Run Process. Follow the wizard instructions. Skew adjustment (only for the 7000 and W7200 Presses) If HP Indigo Print Care is not available perform the following - HP Indigo WS6000 | Writing Head Service Instructions -- CA393-00150Document P/N: - Page 18
knob 4 Skew adjustment knob Color adjust Do the following to verify and adjust the color. 1. Print the WritingHeadFocus.jlt job. 2. From press computer, run the following application: C:\Unicorn\Release\mmi_writingHeadD.exe. The Writing Head window opens. 3. Click the Laser Power tab. Enter the - HP Indigo WS6000 | Writing Head Service Instructions -- CA393-00150Document P/N: - Page 19
Override for Black. 9. Press Enter. Verify focus fine tuning Follow the steps below to verify focus fine tuning. Perform the Verify focus fine tuning on page 10. If HP Indigo Print Care is not the best front focus. Use this value to set the Focus Front adjustment knob. 16 Chapter 3 Troubleshooting - HP Indigo WS6000 | Writing Head Service Instructions -- CA393-00150Document P/N: - Page 20
not achieved, refer to the Writing head troubleshooting guide. Verify and adjust the writing head tilt (Beam spacing) - manual Follow the steps below to verify and adjust the writing head tilt (Beam spacing) - manual on page 11) 1. Click Main Menu > Problem Handling > CE Wizards > SysTab Editor. 2. - HP Indigo WS6000 | Writing Head Service Instructions -- CA393-00150Document P/N: - Page 21
the length of the image Linear deskew correction If HP Indigo Print Care is not available perform the following procedure: 1. Print the WritingHeadFocus.jlt job. 2. Click Main Menu > Problem Handling > CE Wizards > SysTab Editor. 3. Select: whDeskewParametersTopic > whDeskewParametersTopic[2]. 4. In - HP Indigo WS6000 | Writing Head Service Instructions -- CA393-00150Document P/N: - Page 22
5. Use a lupe (or another magnification device) to check the deskew pattern in the vertical lined area of the WritingHeadFocus.jlt printout (see figure below and Verify focus fine tuning on page 10). Figure 3-6 Deskew saw-tooth pattern seen in the WritingHeadFocus.jlt printout If the saw-tooth - HP Indigo WS6000 | Writing Head Service Instructions -- CA393-00150Document P/N: - Page 23
HP Indigo Print Care is not available, perform the follow procedure: Measure the LSP at the WHEL24 terminal using the writing head camera as follows: 1. Change the user mode to Technician mode and verify that the consoles are open. 2. Put the press into the Ready state. 3. Click Main Menu > Problem - HP Indigo WS6000 | Writing Head Service Instructions -- CA393-00150Document P/N: - Page 24
click Setup > Restore Setup. Make sure that the screen turns yellow. 12. From the WHEL24 terminal window, press ALT+M. The MACRO: Open Macro window opens. Figure 3-9 Open Macro window NOTE: Make sure that the press is in Ready mode. 13. Double-click the Whel24.ttl file. The Main Menu window opens - HP Indigo WS6000 | Writing Head Service Instructions -- CA393-00150Document P/N: - Page 25
get an LSP reading on page 23 ● If there is an LSP answer, then continue with Line spacing using AAP on page 24 22 Chapter 3 Troubleshooting - HP Indigo WS6000 | Writing Head Service Instructions -- CA393-00150Document P/N: - Page 26
Select Start download, and wait until the camera screen appears. 5. Center the spots (or the lines) on the screen as follows: Click Main Menu > Problem Handling > CE Wizards > SysTab Editor. Select Whel24soscamera, and adjust the values of Origin Y and Origin X until the lines are centered. Save the - HP Indigo WS6000 | Writing Head Service Instructions -- CA393-00150Document P/N: - Page 27
line spacing using AAP. 1. Insert the parameters diskette or CD into the press computer drive. 2. Open the parameter file (.pl file) from the diskette perform the following procedure: 1. Click Main Menu > Problem Handling > CE Wizards > SysTab Editor. 2. Select . 24 Chapter 3 Troubleshooting - HP Indigo WS6000 | Writing Head Service Instructions -- CA393-00150Document P/N: - Page 28
7. If there is a difference between Cyan and Magenta LSP values, choose a value somewhere between the two LSP values, that gives the best print quality. Figure 3-14 Systab showing whel24AnamorphicPrism Adjust the LSP value by the adjustable anamorphic prism AAP 25 - HP Indigo WS6000 | Writing Head Service Instructions -- CA393-00150Document P/N: - Page 29
01 Updated procedures and wizards 02 Updated to include the HP Indigo WS6000 Digital Press and the HP Indigo W7200 Digital Press 03 Updated to WHEL rename procedure for HP Indigo W7200 Digital Press 04 Added HP Indigo 7r Digital Press to scope 05 Added note about using solvents for cleaning - HP Indigo WS6000 | Writing Head Service Instructions -- CA393-00150Document P/N: - Page 30
the date of release. Check CE Suitcase for the most recent version of this document. This document contains valuable trade secrets and confidential information of HP. Nothing herein may be copied, reproduced or distributed in any form or medium, or disclosed to any third party in any manner, without
-
 1
1 -
 2
2 -
 3
3 -
 4
4 -
 5
5 -
 6
6 -
 7
7 -
8
-
9
-
10
-
11
-
12
-
13
-
14
-
15
-
16
-
17
-
18
-
19
-
20
-
21
-
22
-
23
-
24
-
25
-
26
-
27
-
28
-
29
-
30
 |
 |

Writing Head Service Instructions
Installation instruction details
Purpose
This guide describes the installation and configuration of the writing head during
initial
press installation
and as a
spare part
.
Scope
HP Indigo 7000 Digital Press, HP Indigo 7900 Digital Press, HP Indigo WS6000 Digital
Press and HP Indigo W7200 Digital Press, HP Indigo 7r Digital Press
Document number
CA393-00150Document P/N:
Revision number
06Revision number:
Date
27 September 2016
Security level
HP Confidential
The information contained in this document is accurate at the date of release.
Check CE Suitcase for the most recent version of this document.
i