HP Indigo WS6000 Writing Head Service Instructions -- CA393-00150Document P/N: - Page 9
Loading the writing head parameters, Focus Rear
 |
View all HP Indigo WS6000 manuals
Add to My Manuals
Save this manual to your list of manuals |
Page 9 highlights
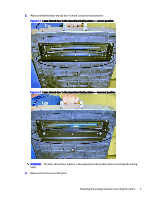
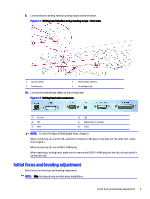
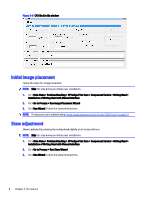
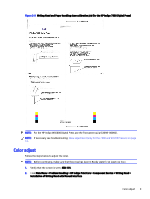
1. Turn the Focus Front adjustment knob "down" (counter-clockwise) until it is loose. 2. Turn the Focus Rear adjustment knob "down" (clockwise) until it is loose. 3. Turn the Leveling adjustment knob "down" (clockwise) until it is loose. Figure 2-6 Skew, leveling and focus adjust mechanisms - front view 1 Leveling adjustment knob 2 Skew adjustment knob 3 Edge of the writing head (for leveling) 4 Edge of the press frame (for leveling) 5 Focus Front adjustment knob 6 Focus Rear adjustment knob 7 Front focus locking screw 4. Turn the above three adjustment knobs "up" until there is a slight resistance (sometimes called "backlash"). 5. Turn the above three adjustment knobs "up" according to the Focus Adjustment label on the press. An example of adjusting the knobs: To adjust the rear focus to 4.3 as shown on the label, turn Focus Rear adjustment knob 4 full turns (counter-clockwise), and an additional 3 line marks. Figure 2-7 Example of the Focus Adjustment label on the press 6. Test the initial focus adjustments by printing the WritingHeadFocus.jlt job. Loading the writing head parameters Every writing head has its own parameters. These are stored on a diskette or CD that is kept in a plastic sleeve attached to the top of the writing head. NOTE: Skip this step during an initial press installation. Only verify that the parameters have been loaded correctly. NOTE: Make sure that the S/N on the writing head is the same as the S/N on the parameters diskette or CD. 6 Chapter 2 Procedures
-
 1
1 -
2
-
3
-
 4
4 -
 5
5 -
 6
6 -
 7
7 -
 8
8 -
 9
9 -
 10
10 -
 11
11 -
 12
12 -
 13
13 -
 14
14 -
15
-
16
-
17
-
18
-
19
-
20
-
21
-
22
-
23
-
24
-
25
-
26
-
27
-
28
-
29
-
30
 |
 |
