HP Indigo WS6000 Writing Head Service Instructions -- CA393-00150Document P/N: - Page 6
WARNING, Remove the roof cover of the press.
 |
View all HP Indigo WS6000 manuals
Add to My Manuals
Save this manual to your list of manuals |
Page 6 highlights
3. Make sure that the laser shroud door is in the closed (vertical) position. Figure 2-1 Laser shroud door in the closed (vertical) position - correct position Figure 2-2 Laser shroud door in the closed (vertical) position - incorrect position WARNING! The laser shroud door must be in the closed (vertical) position before mounting the writing head. 4. Remove the roof cover of the press. Mounting the writing head and connecting the cables 3
-
 1
1 -
 2
2 -
 3
3 -
 4
4 -
 5
5 -
 6
6 -
 7
7 -
 8
8 -
 9
9 -
 10
10 -
 11
11 -
 12
12 -
13
-
14
-
15
-
16
-
17
-
18
-
19
-
20
-
21
-
22
-
23
-
24
-
25
-
26
-
27
-
28
-
29
-
30
 |
 |

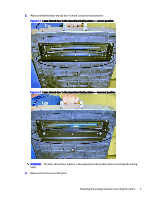
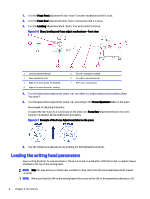
3.
Make sure that the laser shroud door is in the closed (vertical) position.
Figure 2-1
Laser shroud door in the closed (vertical) position — correct position
Figure 2-2
Laser shroud door in the closed (vertical) position — incorrect position
WARNING!
The laser shroud door must be in the closed (vertical) position before mounting the writing
head.
4.
Remove the roof cover of the press.
Mounting the writing head and connecting the cables
3