HP Indigo WS6000 Writing Head Service Instructions -- CA393-00150Document P/N: - Page 27
Line spacing using AAP, Adjusting Line spacing using AAP
 |
View all HP Indigo WS6000 manuals
Add to My Manuals
Save this manual to your list of manuals |
Page 27 highlights
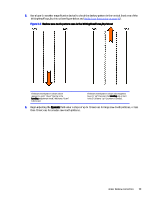
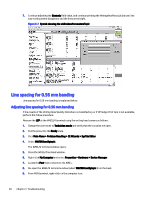
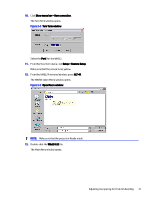
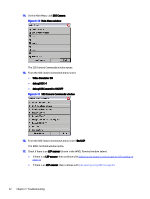
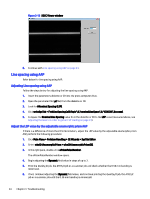
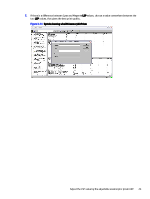
Figure 3-13 SOSC Viewer window 6. Continue with Line spacing using AAP on page 24. Line spacing using AAP Refer below for line spacing using AAP. Adjusting Line spacing using AAP Follow the steps below for adjusting the line spacing using AAP. 1. Insert the parameters diskette or CD into the press computer drive. 2. Open the parameter file (.pl file) from the diskette or CD. 3. Look for #Nominal Spacing (LSP). 4. Click writeSysTab > ("whLineSpacingCalibTopic",0,"nominalLineSpace",0,"XXXXXX",$access). 5. Compare the Nominal Line Spacing value from the diskette or CD to the LSP value (measured above, see Adjusting the lasers in order to get an LSP reading on page 23). Adjust the LSP value by the adjustable anamorphic prism AAP If there is a difference of more than 0.5 micrometers, adjust the LSP value by the adjustable anamorphic prism AAP, perform the following procedure: 1. Click Main Menu > Problem Handling > CE Wizards > SysTab Editor. 2. Select whel24AnamorphicPrism > whel24AnamorphicPrism[0]. 3. In the right pane, double-click aPrismPulseNumber. The aPrismPulseNumber window opens. 4. Begin adjusting the Dynamic field value in steps of up to 3. 5. Print the Quality.jlt job, the ATP2.jlt job or a customer job and check whether the 0.56 mm banding is minimized. 6. If not, continue adjusting the Dynamic field value, and continue printing the Quality.jlt job, the ATP2.jlt job or a customer job until the 0.56 mm banding is minimized. 24 Chapter 3 Troubleshooting
-
 1
1 -
2
-
3
-
4
-
5
-
6
-
7
-
8
-
9
-
10
-
11
-
12
-
13
-
14
-
15
-
16
-
17
-
18
-
19
-
20
-
21
-
 22
22 -
 23
23 -
 24
24 -
 25
25 -
 26
26 -
 27
27 -
 28
28 -
 29
29 -
 30
30
 |
 |
