HP Indigo WS6000 Writing Head Service Instructions -- CA393-00150Document P/N: - Page 17
Troubleshooting, Loading the writing head parameters
 |
View all HP Indigo WS6000 manuals
Add to My Manuals
Save this manual to your list of manuals |
Page 17 highlights
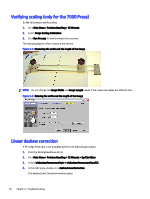
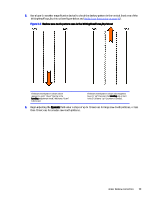
3 Troubleshooting This topic explains about troubleshooting the writing head. Loading the writing head parameters Do the following to load the writing head parameters. 1. Click Main Menu > Problem Handling > CE Wizards > SysTab Editor. 2. Select W960LaserControlPropertiesTopic, and verify that the name of the writing head format correction file: "FC6xxxx.dat" has been updated with the writing head serial number. If not, update the value. 3. Select whDeskewParametersTopic > whDeskewParametersTopic[2] > deskewLinearCorrection, and verify that the Dynamic value is the same as the Saved value. If not, copy the Saved value to the Dynamic value. Initial image placement (only for the 7000 Press) If HP Indigo Print Care is not available perform the following procedure: 1. Click Main Menu > Problem Handling > CE Wizards. 2. Select Image Placement Calibration. 3. Click Run Process. Follow the wizard instructions. Skew adjustment (only for the 7000 and W7200 Presses) If HP Indigo Print Care is not available perform the following procedure: 1. Print the skew_test.jlt job and measure the skew value by comparing the print to the reference Skew Test transparency image. NOTE: If a transparency is not available, place two printed sheets back to back against a window and align the top corners of the two images. TIP: Force M or C color when printing the skew_test.jlt job to easily distinguish between the print and the transparency. 2. Measure the skew value as follows: a. Place the transparency reference image over the printed image. Line up the upper left corner of the transparency with the upper frame of the image. b. Read the skew value on the Vernier scale to an accuracy of 0.1 mm. The maximum permitted skew value is 0.5 mm. 14 Chapter 3 Troubleshooting
-
 1
1 -
2
-
3
-
4
-
5
-
6
-
7
-
8
-
9
-
10
-
11
-
 12
12 -
 13
13 -
 14
14 -
 15
15 -
 16
16 -
 17
17 -
 18
18 -
 19
19 -
 20
20 -
 21
21 -
 22
22 -
23
-
24
-
25
-
26
-
27
-
28
-
29
-
30
 |
 |
