HP Indigo WS6000 Writing Head Service Instructions -- CA393-00150Document P/N: - Page 20
Verify and adjust the writing head tilt (Beam spacing) – manual, Rear Focus
 |
View all HP Indigo WS6000 manuals
Add to My Manuals
Save this manual to your list of manuals |
Page 20 highlights
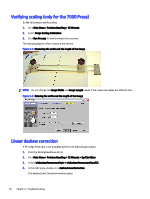
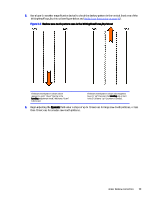
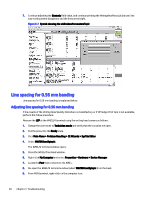
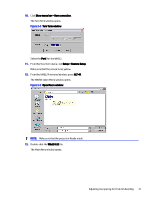
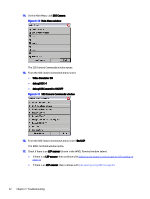
4. Find the printout that has the best rear focus. Use this value to set the Focus Rear adjustment knob. 5. If an acceptable level of banding was not achieved, refer to the Writing head troubleshooting guide. Verify and adjust the writing head tilt (Beam spacing) - manual Follow the steps below to verify and adjust the writing head tilt. Perform the Verify and adjust the writing head tilt (Beam spacing) - manual on page 11. If the line spacing in the horizontal lines of the WritingHeadFocus.jlt printout is not uniform, do the following: (see Verify and adjust the writing head tilt (Beam spacing) - manual on page 11) 1. Click Main Menu > Problem Handling > CE Wizards > SysTab Editor. 2. Select whel24AnamorphicPrism > whel24AnamorphicPrism[0]. 3. In the right pane, double-click aPrismPulseNumber. The aPrismPulseNumber window opens. 4. Begin adjusting the Dynamic field value in steps of up to 3. 5. Print the WritingHeadFocus.jlt job again and check if the line spacing of the horizontal lines is uniform. 6. If not, continue adjusting the Dynamic field value, and continue printing the WritingHeadFocus.jlt job until the line spacing of the horizontal lines is uniform, all along the width of the printout (from right to left). Figure 3-3 Systab showing whel24AnamorphicPrism 7. If it is not possible to reach uniform line spacing of the horizontal lines on the left and right sides at the same time, then turn the focus adjustment knobs in opposite directions in small increments of less than 0.25 turns and verify the change on the horizontal lines. Turn the Rear Focus knob to adjust the left side of the line, and turn the Focus Front knob to adjust the right side of the line. Verify and adjust the writing head tilt (Beam spacing) - manual 17
-
 1
1 -
2
-
3
-
4
-
5
-
6
-
7
-
8
-
9
-
10
-
11
-
12
-
13
-
14
-
 15
15 -
 16
16 -
 17
17 -
 18
18 -
 19
19 -
 20
20 -
 21
21 -
 22
22 -
 23
23 -
 24
24 -
 25
25 -
26
-
27
-
28
-
29
-
30
 |
 |
