HP Indigo ws4500 Rewinder Service - Page 15
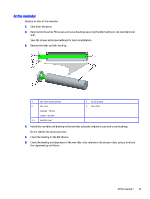
At the rear of the rewinder, Replacing an idler
 |
View all HP Indigo ws4500 manuals
Add to My Manuals
Save this manual to your list of manuals |
Page 15 highlights
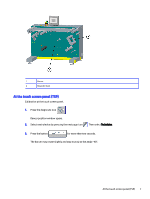
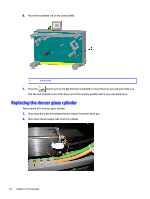
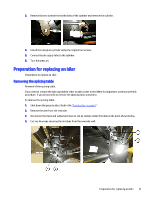
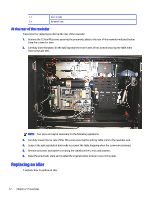
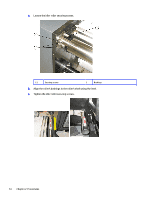
1, 3 Input air tube 2, 4 Output air tube At the rear of the rewinder Preparation for replacing an idler at the rear of the rewinder. 1. Remove the 12 hex M6 screws securing the pneumatic plate to the rear of the rewinder indicated below. Save the screws for later. 2. Carefully lower the plate. On the splicing table there are 6 sets of hex screws securing the table arms (two screws per set). NOTE: Two persons may be necessary for the following operations. 3. Carefully loosen the six sets of Hex M6 screws securing the splicing table arms to the rewinder wall. 4. Support the splicing table at both ends to prevent the table dropping when the screws are removed. 5. Remove all screws and washers securing the tableSave the screws and washers. 6. Raise the pneumatic plate and reinstall the original twelve screws to secure the plate. Replacing an idler It explains how to replace an idler. 12 Chapter 2 Procedures
-
 1
1 -
2
-
3
-
4
-
5
-
6
-
7
-
8
-
9
-
 10
10 -
 11
11 -
 12
12 -
 13
13 -
 14
14 -
 15
15 -
 16
16 -
 17
17 -
 18
18 -
 19
19 -
 20
20 -
21
-
22
-
23
-
24
-
25
-
26
-
27
-
28
-
29
-
30
-
31
-
32
-
33
-
34
-
35
-
36
-
37
-
38
-
39
-
40
-
41
-
42
-
43
-
44
-
45
-
46
-
47
-
48
-
49
-
50
-
51
-
52
-
53
-
54
-
55
-
56
-
57
-
58
-
59
-
60
-
61
-
62
-
63
-
64
-
65
-
66
-
67
-
68
-
69
-
70
-
71
-
72
-
73
-
74
-
75
-
76
-
77
-
78
-
79
-
80
-
81
-
82
-
83
-
84
-
85
-
86
-
87
-
88
 |
 |