HP Indigo ws4500 Rewinder Service - Page 16
At the rewinder
 |
View all HP Indigo ws4500 manuals
Add to My Manuals
Save this manual to your list of manuals |
Page 16 highlights
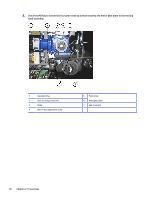
At the rewinder Replace an idler at the rewinder. 1. Shut down the press. 2. Remove the three hex M6 screws and screw bushings securing the idler bushing to the rewinder inner wall. Save the screws and screw bushings for later reinstallation. 3. Remove the idler and idler bushing. 1 Idler roller securing screw 2 Idler roller Diameter - 80 mm Length - 365 mm 3, 5 Hex M6 screws 4 Screw bushing 6 Idler shaft 4. Install the new idler and bushing to the rewinder using the original screws and screw bushings. Do not tighten the securing screws. 5. Check the leveling on the RW chassis. 6. Check the leveling and alignment of the new idler roller relative to the dancer rollers using a level and the alignment jig as follows: At the rewinder 13
-
 1
1 -
2
-
3
-
4
-
5
-
6
-
7
-
8
-
9
-
10
-
 11
11 -
 12
12 -
 13
13 -
 14
14 -
 15
15 -
 16
16 -
 17
17 -
 18
18 -
 19
19 -
 20
20 -
 21
21 -
22
-
23
-
24
-
25
-
26
-
27
-
28
-
29
-
30
-
31
-
32
-
33
-
34
-
35
-
36
-
37
-
38
-
39
-
40
-
41
-
42
-
43
-
44
-
45
-
46
-
47
-
48
-
49
-
50
-
51
-
52
-
53
-
54
-
55
-
56
-
57
-
58
-
59
-
60
-
61
-
62
-
63
-
64
-
65
-
66
-
67
-
68
-
69
-
70
-
71
-
72
-
73
-
74
-
75
-
76
-
77
-
78
-
79
-
80
-
81
-
82
-
83
-
84
-
85
-
86
-
87
-
88
 |
 |

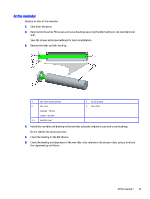
At the rewinder
Replace an idler at the rewinder.
1.
Shut down the press.
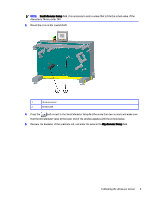
2.
Remove the three hex M6 screws and screw bushings securing the idler bushing to the rewinder inner
wall.
Save the screws and screw bushings for later reinstallation.
3.
Remove the idler and idler bushing.
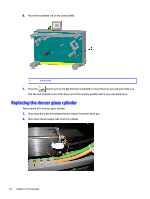
1
Idler roller securing screw
4
Screw bushing
2
Idler roller
Diameter – 80 mm
Length – 365 mm
6
Idler shaft
3, 5
Hex M6 screws
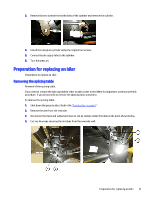
4.
Install the new idler and bushing to the rewinder using the original screws and screw bushings.
Do not tighten the securing screws.
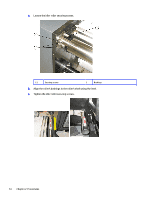
5.
Check the leveling on the RW chassis.
6.
Check the leveling and alignment of the new idler roller relative to the dancer rollers using a level and
the alignment jig as follows:
At the rewinder
13