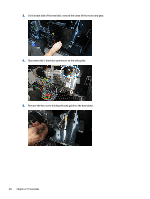
HP Indigo ws4500 Rewinder Service - Page 64
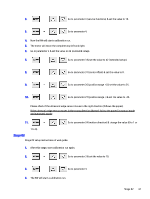
Stage #2, Go to parameter 24 motion direction & change the value 0 to 1 or
 |
View all HP Indigo ws4500 manuals
Add to My Manuals
Save this manual to your list of manuals |
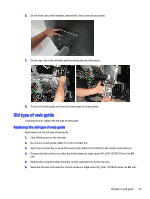
Page 64 highlights
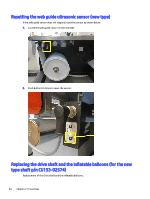
2. Go to parameter 3 (service functions) & set the value to 10. 3. Go to parameter 4. 4. Now the RW will start a calibration run. 5. The motor will move the complete way left and right. 6. Go to parameter 3 & set the value to 42 (extended setup). 7. Go to parameter 3 & set the value to 42 (extended setup). 8. Go to parameter 31 (center offset) & set the value to 0. 9. Go to parameter 26 (position range +) & set the value to 25. 10. Go to parameter 27 (position range -) & set the value to -25. Please check if the ultrasonic edge sensor moves in the right direction (follows the paper). If the ultrasonic edge sensor moves in the wrong direction (doesn't follow the paper) in manual mode and automatic mode: 11. Go to parameter 24 (motion direction) & change the value (0 to 1 or 1 to 0). Stage #2 Stage #2 setup instructions of web guide. 1. After this stage, start calibration run again. 2. Go to parameter 3 & set the value to 10. 3. Go to parameter 4. 4. The RW will start a calibration run. Stage #2 61
-
 1
1 -
2
-
3
-
4
-
5
-
6
-
7
-
8
-
9
-
10
-
11
-
12
-
13
-
14
-
15
-
16
-
17
-
18
-
19
-
20
-
21
-
22
-
23
-
24
-
25
-
26
-
27
-
28
-
29
-
30
-
31
-
32
-
33
-
34
-
35
-
36
-
37
-
38
-
39
-
40
-
41
-
42
-
43
-
44
-
45
-
46
-
47
-
48
-
49
-
50
-
51
-
52
-
53
-
54
-
55
-
56
-
57
-
58
-
 59
59 -
 60
60 -
 61
61 -
 62
62 -
 63
63 -
 64
64 -
 65
65 -
 66
66 -
 67
67 -
 68
68 -
 69
69 -
70
-
71
-
72
-
73
-
74
-
75
-
76
-
77
-
78
-
79
-
80
-
81
-
82
-
83
-
84
-
85
-
86
-
87
-
88
 |
 |