HP Integrity rx2800 Boot from SAN Guide - Page 23
Step 4 – Hardware setup – SAN configuration, Step 4a – Con the host boot order
 |
View all HP Integrity rx2800 manuals
Add to My Manuals
Save this manual to your list of manuals |
Page 23 highlights
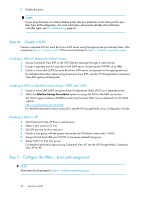
b. Determine your virtualization strategy by using factory supplied Ethernet MAC addresses and fibre channel WWNs or have the virtual connect virtualize them. c. Determine the oversubscription ratio to use. d. Determine if you will use VCM to configure boot path information for the HBAs or will perform this step through the HBA BIOS which is the default. 2. Log in to the Virtual Connect Manager (VCM) on your c-Class enclosure. 3. It is recommended that you follow the VCM setup wizards to set up and configure the VC domain, network and fibre channel parameters. 4. Create server profiles for all servers. Set PXE to Enabled if you will use RDP to build your Boot from SAN medium. Select the Show Fibre Channel Boot Parameters box. 5. In the list of ports, choose the port connected to the desired boot path HBA and select Primary. 6. Enter the target WWPN of your desired boot device. 7. Enter the LUN number of the virtual disk that will be presented to this host. 8. To set up a failover path if desired, enter the secondary target WWPN and LUN, then select `Secondary for this path. This path should not be zoned at this time. 9. Set any other ports to Disabled. 10. Reboot the server blade. 11. See Step 4b - Setting up swich zoning. Step 4 - Hardware setup - SAN configuration Perform the following steps to set up all host systems: • Step 4a - Configure the host boot order • Step 4b - Setting up swich zoning • Step 4c - Create a LUN Step 4a - Configure the host boot order If you plan to use the Virtual Connect Manager (VCM) to setup boot path information, go to Step 4B. The VCM will automatically set the boot order. 1. Verify that you have the latest server BIOS. 2. Set the boot order: a. While the system is booting, press F9 to start the ROM BIOS Setup Utility (RBSU). b. Select Boot Controller Order. c. Select the primary HBA (that is, the HBA dedicated to your SAN or presented to your boot LUN) and move it to Controller Order 1. d. Disable the Smart Array Controller as follows: • From the main RBSU menu, select PCI Devices. • Select the internal array from the list of devices and the Disable option from the drop- down box. • Press the Escape key to return to main menu. • Press the Escape key, then press the F10 key to save your configuration and exit the utility. Step 4b - Setting up switch zoning 1. Create a zone that includes the HBA boot port WWPN and one active host port from the target storage. Fibre Channel host bus adapters software guide for Windows 23
-
 1
1 -
2
-
3
-
4
-
5
-
6
-
7
-
8
-
9
-
10
-
11
-
12
-
13
-
14
-
15
-
16
-
17
-
 18
18 -
 19
19 -
 20
20 -
 21
21 -
 22
22 -
 23
23 -
 24
24 -
 25
25 -
 26
26 -
 27
27 -
 28
28 -
29
-
30
-
31
-
32
-
33
-
34
-
35
-
36
-
37
-
38
-
39
-
40
-
41
-
42
-
43
-
44
 |
 |